Everything you need for Z6 swap into RT4WD Wagon
 AintGotNoSol
Wagonist
AintGotNoSol
Wagonist
Hey everybody. I just finished up my D16Z6 swap into my 89 RT4WD. It was a big pain in the ass, mostly due to lack of information. I spent 2 weeks researching this swap before I even started, and I thought I had found a wealth of info. Turns out there were quite a few issues that I hadn't been aware of.
My goal here is to point out all of the interface problems I didn't seem to find, and also bring all of the other scattered info together in one post, so anyone who wants to do this swap in the future can quickly and easily find all of the info. Perhaps we can get this thread added to the quicklinks sticky. Yes, I know there is a link in there for D-series swaps, but that thread is about which engines will work. Mine is specifically about the D16Z6, and what is required.
This thread specifically covers swapping a D16Z6 into a 1989 Civic Wagon RT4WD (replacing the original D16A6), and converting to OBD-1 using the P28 ECU and a jumper harness kit. I have been told you can just get on OBD-0 VTEC ecu and convert the engine to OBD-0, add some VTEC wires, etc. I haven't tried it, so its not in here.
If you have useful info to add, please reply, and I'll include it in the post!
I got a lot of useful info here but it's really spread out.
Here we go:
Z6 parts:
(Most of this should come attached to your engine, make sure its there or that you can get it somewhere else)
Engine*
ECU*
Intake manifold (with all sensors attached)*
Fuel Rail*
Map sensor*
Distributor*
Four-Wire O2 Sensor*
VTEC Solenoid & Pressure switch*
Fan Switch (on thermostat housing)*
A6 Parts:
Motor mount*
Oil pan*
Oil pickup*
Intermediate shaft*
Clutch cover*
Exhaust manifold*
Injectors*
Fuel pressure regulator*
AC compressor and bracket*
PS pump and bracket*
Crank pulley*
4WD trans (obviously)*
Starter*
Purge control*
Clutch & Flywheel*
Intake & air filter*
Throttle Cable*
Fuel lines*
Radiator & Fans*
Lower Radiator Hose*
Aftertmarket parts
OBD0-OBD1 ECU jumper harness*
Distributor plug jumpers (or re-pin the plugs)*
Add new wires for VTEC pressure switch, VTEC solenoid, and 4-wire O2 sensor *
OR
Rywire complete kit : $189 + shipping*
Needs Modification:
Map sensor Wiring*
Fan Switch Wiring*
IAT Sensor Wiring*
Upper Radiator hose*
Intermediate shaft mounting holes*
NOTE: This was performed on a USDM Wagon, so Driver side refers to the Left side, and Passenger side refers to the Right side (when seated in the car).
Engine:
D16Z6 (1.6L SOHC VTEC) from 92-95 Civic Si / EX, 92-95 del Sol Si.
I used a JDM D16A, basically identical to the Z6. I was running this in my del Sol for the past 7+years, it was a direct replacement for the Z6 with no modification required. If you notice any differences that I may have overlooked, please let me know and I will add them to this section.
Transmission:
You will obviously need to use the original 4WD transmission for this swap. There is no other trans that you can use as far as i know.
NOTE: You will have to pull the engine and transmission out of the car together, and drop them back in together. there simply isn't enough room to separate them in the car, or remove them separately. Also, the oil pan and the clutch cover can only be removed or installed with the transmission removed from the motor. Yes, this means you will have to pull the entire engine/trans any time you need to do an oil pan gasket, so do it right the first time.
Clutch and Flywheel:
Info Here
Basically, match the clutch and flywheel to the transmission. Some years have different flywheels and clutches, specifically the 1988. Here is a list of the actual differences:
UPDATE: ok here's a little more info do explain the differences in clutch / flywheel setups...
From my memory, Civic / CRX / Wagon all use the same clutch & flywheel setups within each specific year, except the 4WD trans uses a different throwout bearing (or release bearing, whatever you prefer to call it)
ANY d-series flywheel will bolt to ANY d-series engine. The differences are in the Transmission's Input shaft (number of splines varies) and the surface area of the pressure plate / clutch disc / flywheel. The overall diameter of the flywheel is the same, and the tooth count is 109 on all of them.
I gathered these numbers from honda-tech, DSO, and several other sites.
1988 = 21 spline mainshaft, 190 mm disc
1989 = 20 spline mainshaft, 200 mm disc
1990-2000 = 20 spline mainshaft, 212 mm disc
If your transmission is an 88, you HAVE to use the 88 clutch/pressure plate/flywheel setup.
If you have the 89, you can use any setup from an 89 or any 90-00 as long as you MATCH THE CLUTCH DISC/PRESSURE PLATE/FLYWHEEL together. (example, you can put any 90-00 clutch disc / pressure plate / flywheel into an 89 if all 3 parts are from the same year, but you can't mix and match parts between the 89 style and the 90-00 style. 91 clutch disc will not match with 89 pressure plate, etc)
I've tried to make this as clear as possible, but if you have any questions specific to your year transmission, and what will or won't fit, shoot me a PM and I'll try to help you clear it up.
I have an 89, and I happened to have an ACT clutch and flywheel in my 93 del Sol. ACT's website lists the same part numbers for 93 del Sol and 89 RT4WD Wagon. I used the del Sol flywheel / clutch / pressure plate and so far I have had no issues to report. They seem to be working just fine, the only difference is a little extra pedal effort.
Clutch Cover
This is the plate that covers the lower portion of the transmission. It bolts onto two of the oil pan studs, and has one bolt in the middle of the bottom that threads into the transmission casing. You need to use the one from the A6 to clear the intermediate shaft. Be sure you put this on the engine BEFORE you attach the transmission, and then add the last bolt afterwords. You CAN NOT get this shield in or out with the transmission in place! (oops)
Intermediate Shaft:
The RT4WD uses equal length front driveshafts, with an intermediate shaft on the driver side. This intermediate shaft bolts to the back of the engine block. There is much discussion about which blocks do or don't have the holes for mounting the shaft. My engine (and most Z6's it seems) had only one hole already drilled and tapped. The other two holes were incomplete, I guess they're just guide holes.
Here's a pic of the location. You will need those three holes which have no bolts installed in this pic. One is just beside the oil filter, and the other two are just below it. Photo was borrowed from bam-bam.
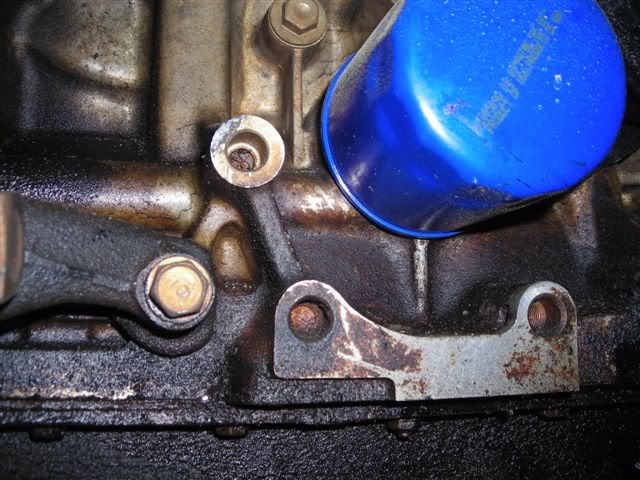
If this is the case, you will need to drill and tap them. The bolts to hold the shaft have M10 x 1.25 threads and a larger 12mm shoulder just before the head. The way to do it is, drill the small hole, then the shoulder section, then tap the smaller hole. You would tap the threads last so you don't damage them while drilling the shoulder area.
If you know someone who is more experienced than you with drilling, and you trust them to work on your engine block, I would suggest you get their help. I had my dad come over and help, he has lots of drilling experience. I had him drill while I watched from different angles to make sure he was drilling straight.
The smaller hole, for the threaded section, will need to be drilled with an 11/32" drill bit. The shoulder area uses a 1/2" bit. The tap size is M10 x 1.25. Make sure you have good quality drill bits and taps, and drill them STRAIGHT! I suggest getting an engine stand to hold the engine still. if you try this with the engine just laying on the floor or on a tire or whatever, it's most likely going to move around.
Do not drill too deep! You will end up drilling right into the internals of the engine. Take your bolts, and slide them into the holes on the intermediate shaft mounting plate. Hold your drill bit up beside the threaded section of the bolt that is sticking out of the back, with the pointed end of the bit agains the shaft's plate. Temporarily mark the drill bit at the end of the bolt. This is how far the bolt needs to go into the block. You will need to drill a little DEEPER than this, because the pointed end of the drill bit won't cut a complete hole, and also most taps are tapered for the first couple of threads, and the bolt wont thread onto partially cut threads. Now starting at your temporary mark, hold up your tap beside the drill bit, and look at where the tapered section ends and you get fully cut threads. You may want to add about one or two threads to this distance to be sure, and then mark this part of the drill bit. Grab some electrical tape and wrap it at this point, to give you a stopper, so you don't drill too deep.
Before you drill, compare the marked drill bit to the bosses on the block. You can hold the bit up beside the bosses and compare the depth. You should still have plenty of room.
Get a center punch and do your bast to find the dead center of the holes. Make very light marks and then check them from several angles. Once you are sure about it, give it a nice solid center punch to guide the tip of the drill bit.
Just take it nice and slow and make sure you are drilling straight.
When tapping, reverse the tap every 1/4 to 1/2 turn. this will break off the metal shavings from tapping, and prevent them from jamming up in the tap. You may need to stop, remove the tap and clear the debris out of the hole every once in a while.
You will probably need the oil filter removed to tap one or 2 of the holes, MAKE SURE YOU COVER THE AREA WITH A RAG! There will be LOTS of metal shavings. I used a vacuum to clean the shavings as we were drilling and tapping. Just be careful not to suck up your rag!
If you are worried that you don't have the room, or you realize you didn't drill far enough when you are done, you could probably add a washer or two to the bolt to snug it up. I didn't need to, you should be fine.
Starter:
Use the Wagon starter. When you are ready to drop the motor and trans back in the car, put the starter on while its still out of the car. it makes it a hundred times easier.
ECU:
P28 (OBD-1 VTEC) from 92-95 Civic Si / EX, 92-95 del Sol Si. You will need an OBD0-OBD1 Jumper Harness to make it work, or you can try to re-pin the ECU plugs on your own. Yeah. Have fun with that.
I bought my conversion wiring kit from Rywire.com, they sell a whole kit with ECU jumper, Distributor jumpers, and an extra subharness with the plugs for the VTEC Solenoid, VTEC pressure switch, and 4-wire O2 sensor. It is literally plug and play, you just have to run the subharness through the firewall. I cut a slit in the rubber boot around the main harness and fed the subr\harness through there. There are 2 loose wires on the subharness for the Check Engine light switch. there are instructions on the Rywire site about this switch and everything else about this wiring conversion.
I paid $189.00 plus shipping. It was worth every penny.
Intake:
Use the stock intake from the A6, or an aftermarket intake for the wagon or a Civic/CRX. I got one out of my friend's 90 hatch, and it fits on the throttle body and clears the battery. If your battery is relocated, you can use a straight style intake from just about any Civic.
Intake manifold:
The easiest solution is to use the manifold attached to your Z6. (You could prob use the A6 manifold, but you'll have to swap them and probably get a new gasket. I'm not sure about the size of the throttle body, but everyone says the Z6 manifold flows better) As for the sensors and other items attached, here's the rundown:
NOTE: when removing the old engine, BE SURE TO MAKE A NOTE OF WHAT SENSORS GO WHERE!!!! A few of the plugs are the same, and can easily get swapped around. (example: TPS and MAP, and IACV and IAT) Get some masking tape and a Sharpie, and label everything. Plugs, hoses, ground wires, etc... This will save you many headaches.
Throttle Position Sensor (TPS):
No modification needed. Plug this part of the harness into the TPS on the Z6 manifold. Ta-da!
Map sensor:
The Z6 MAP is on the top of the throttle body, and the A6 MAP is on the firewall. I'm pretty sure you can use either one, I used the Z6. The plug won't reach the throttle body from the firewall, so you need to clip the zip tie that holds it there, and gently pull the MAP wires out of the loom (you may need to remove a little electrical tape on the loom itself), all the way back as far as you can, near the passenger side shock tower, where the whole thing is taped together. This should give you enough length to run straight across, over the intake tube, to the throttle body. If you need more length, unbolt the bracket that holds the wiring harness to the shock tower, and just lean it towards the throttle body. Once you are satisfied with the length, cover the MAP wires with electrical tape to protect them and keep it looking clean, and also add a little tape to the loom it came out of, so it doesn't fall off of the wires that remain in it. Alternately, you can use the original MAP sensor on the firewall, and tie the vacuum line into an existing one by cutting and splicing in a plastic t-fitting.
Purge Control Solenoid:
A6 is on firewall, Z6 is on the manifold. They use different wiring plugs, so the simplest way to do it is to use the A6 solenoid, and just plug the vacuum line into the correct location on the Z6 manifold. You may need a slightly longer vacuum line.
Fast Idle Valve:
The A6 intake manifold has the Fast Idle Valve on the rear of the manifold, on the drivers side, and it has an electrical connector. The Z6 Fast Idle Valve is under the throttle body, and does not have a plug, because it is not controlled by the computer, but by coolant temp. The OBD-1 ECU doesn't need it, so you can leave that plug on the harness unplugged. I actually cut the wires off of the harness, and off of the Fast Idle Valve itself, and used the extra wire to extend the wires for the IAT sensor.
Intake Air Temperature (IAT) Sensor:
The sensor and the plug are the same, but due to the location, the plug on the A6 wiring harness won't reach the sensor on the back of the Z6 intake manifold. You will need to cut and extend these 2 wires. Since I didn't need the wires for the Fast Idle Valve, I used those to get some extra length. If you want to do the same, cut the wires as close to the Fast Idle Valve as you can, and trace them back to the plug on the harness. Leave the plug together, and continue to follow the wires all the way back to the main harness. This should give you enough additional length. Make sure you measure it before you cut, just to be sure. When you are sure you have enough length, cut the 2 wires. Next, find the plug for the IAT, and cut the wires at least a few inches away from the plug, so you have some room to work with. You will have to strip the wires and if you screw it up, its better to have a few extra inches to try again. Strip all the wires, solder in the extra wires from the unused section of the harness, and shrink wrap it. PAY ATTENTION and be sure you have it wired up right. The extra section of wires will have different colors. For example, if you connect the red wire to the blue wire, then the other end of the blue wire must connect to the other section of red wire. If you don't want to cut the extra wires out of the harness, or you think you may convert back to the A6 at some point, then you can go buy some extra wire to use instead.
Throttle cable:
The original A6 throttle cable on your wagon will connect to the Z6 manifold just fine. You will need to re-adjust it most likely, and this is simple. Loosen the adjustment nuts, pull the cable back so there is just the tiniest bit of play, and tighten the nuts. I usually take as much play out of the cable as I can, just don't overdo it, or it will hold the throttle open slightly.
Vacuum Lines:
Pretty simple. Nearly everything is the same. There are five vacuum lines connected to the Intake Manifold. There's a large line to the brake booster, another to the PCV Valve, one line between the manifold and the fuel pressure regulator, one from the manifold to one nipple on the Purge Control Solenoid, and a line from the top of the throttle body to the charcoal canister. The Z6 will not have the feed for the line to the MAP sensor on the firewall, because the MAP sensor is actually attached to the throttle body. So if you are using the A6 MAP on the firewall, splice its hose into any other with a t-fitting. Otherwise, use the Z6 MAP and don't worry about the vacuum lines on the A6 one. Just tuck them away or yank them out.
The charcoal canister will have 3 lines coming out of it. One is a rubber hose that routs back through the firewall. the other two are located right on top of one another. The bottom hose is usually braided with some kinda red fabric crap, and it runs to the nipple on the top of the throttle body. The top hose is a simple rubber vacuum line, and it runs to the other nipple on the purge control solenoid. On my canister, the fitting for this line was marked with "PCV" (purge control valve, i assume).
For those of you that like diagrams, I made this in my spare time.
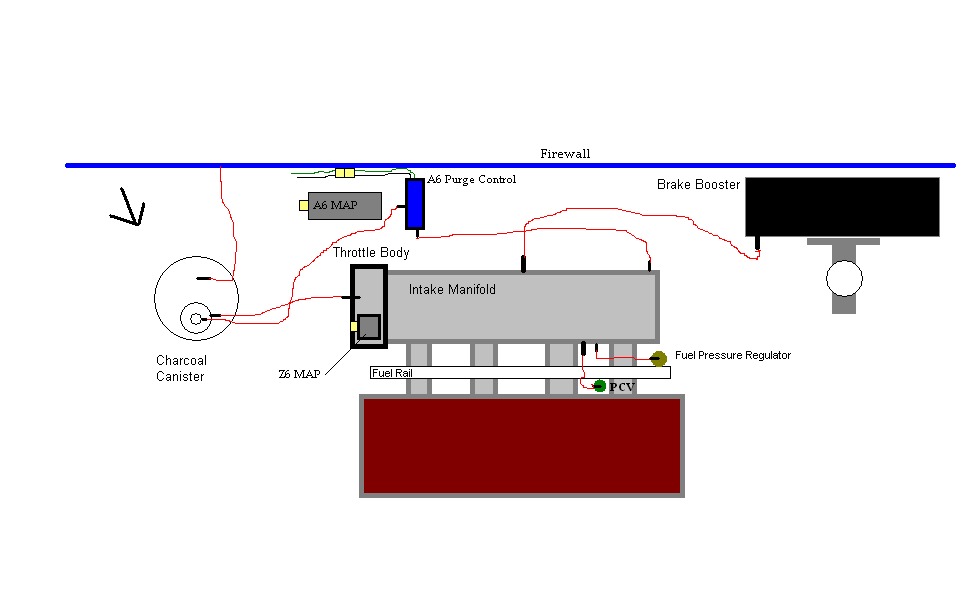
Positive crankcase ventilation (PCV) valve:
A large vacuum hose runs from the intake manifold to a valve situated between the runners, and then to the breather box on the back of the block. As long as you left the Intake manifold on the engine, this will all be good to go.
Idle Air Control Valve (IACV):
The plug on the IACV attached to the Z6 manifold is the same as the plug on the engine harness, just plug it up and you're good to go.
Injectors:
Install the A6 OBD-0 injectors in the Z6 manifold. They will work just fine with the Z6 fuel rail, and they will plug right up to the harness.
Fuel rail:
I used the Z6 because it looks better in my opinion, and everything bolts up to it just fine, other than the harness for the injector plugs. No big deal. You could probably unclip the plastic cover on the harness and use the cover from the Z6 so it attaches to the rail if you wanna get really anal about it. The A6 fuel rail might work, depends on whether or not the studs line up. I never checked it, so I can't tell you for sure.
Fuel pressure regulator (FPR):
Use the A6 version. The feed for the fuel return on the Z6 unit is actually smaller than the return line in the wagon, and may cause leaks.
Fuel lines:
Just use what's already in the wagon. Should work just fine.
Distributor:
Use the OBD-1 distributor for the Z6. You can either get extra plugs off a donor car, and re-pin them yourself, or buy jumper plugs. I bought jumper plugs, and it literally takes 3 seconds to install. I highly recommend it.
O2 Sensor:
Since we are converting to OBD-1, you need the 4-wire O2 sensor (unless you are running a chipped ECU with the O2 bypassed). It will fit right into the stock A6 wagon exhaust manifold, but you will have to either install some extra wires to run back to the ECU, or you can order a subharness that will add the needed wires and plug, and run them back to the ECU. I can't stress this point enough, I REALLY recommend you buy a wiring conversion kit. At least two thirds of all swap problems are wiring related, and a good quality kit will literally plug right in, eliminating the chance that you screw something up, and saving you several hours of wiring and soldering and shrink wrapping.
VTEC Solenoid and VTEC Pressure Switch:
These should come attached to your Z6 motor. Located on the solenoid housing (rear passenger side of the head), one plug has 2 wires, the other has one. Either add the plugs and wires yourself, or get the kit.
Fan Switch:
The A6 fan switch is on the back of the block, above the oil filter, abd the Z6 switch is on the thermostat housing. They use TOTALLY different plugs, and the wires won't be long enough to reach. Go to the junkyard or find a donor car (92-95 civic/del sol, some accords work as well. anything with the right plug and enough wire attached). Find the green plug for the fan switch on the thermostat housing, and unplug it. Start removing tape and separating the wires from the harness. Get as much wire as you can with it. You only need about 9 inches or so, but get extra just in case. Now grab the harness from your wagon (all of the wiring stuff is easier to do with the harness out of the car and off the engine) and find the plug for the fan switch. It's actually two single push-on plugs with a big rubber boot covering them. Cut the wires and get rid of the boot and the plugs. Strip the ends of the wires, and do the same to the wires on the new fan switch. From what I have read, it doesn't matter which wire goes to which, but I believe they were the same colors, so I just matched them up. Connect, solder, shrink wrap, done.
Exhaust:
The original A6 manifold from the wagon will work, and will clear the transfer case and oil pan. The Z6 manifold will not clear them, neither will any 4-2-1 manifold for the Civic or CRX that I know of. It seems no one makes an aftermarket header for the RT4WD, you need to make something custom if you want one. I haven't spent much time looking into this, but I know there is info on this forum, and there are a few members who have come up with their own solutions. Until I get time to research this more, start with the link below. There are a few names in there of people who have done it.
Start here
There is very little room to get the header in and out with the engine installed, even with the radiator and fans removed. The easiest way is to just loosen the nuts(soak them in PB Blaster for a while so they don't seize up and snap the studs), pull the manifold out with the motor, then remove it afterwords. Install it onto the Z6 motor before lowering it into the car, or you will have a pain getting it in later.
The catalytic converter and the rest of the exhaust pipe will bolt right up to the stock manifold.
Oil pan:
You have to use the A6 oil pan from the RT4WD wagon, its the only one that will clear the transfer case. You can try to dent up your Z6 pan, but it's going to take a lot of work, and you risk warping the mating surface, and causing oil leaks. If the pan leaks, you have to remove the entire engine and transmission to get the pan off. Do it right the first time, use the A6 wagon pan. It's a direct fit, no modification required. Go ahead and get a new gasket, and pop some gasket sealer on it to be sure, especially around the crankshaft.
Oil pickup:
VERY IMPORTANT! You MUST use the pickup that matched your oil pan! Since we are using the A6 wagon pan, use the A6 wagon pickup. I believe some other pickups can be used, I will look into this. YOU CANNOT USE THE Z6 PICKUP WITH THE A6 PAN!!!! Trust me, the pickup will be pressed against the pan, and will not be able to pickup the oil. It's very easy to swap them, and its a direct fit.
Motor Mounts:
Since we are using the 4WD trans, and 3 of the mounts bolt to the trans (the rear mount, side mount, and the front torque mount), all we need to worry about is the driver side engine mount. Use the original RT4WD Wagon mount and the bracket that bolts to the block. There are two bolts that hold the bracket onto the block, and to get to them, you will have to remove the timing covers. In order to get the lower timing cover off, you will need to remove the crank pulley. Yeah, its a pain in the ass if it hasn't been removed in several years.
You will need to trim a little bit of the upper and lower timing covers to clear the new mount bracket. Bolt up the bracket, then hold the covers up to it and eyeball what needs to come off. It's not a lot, and a good pair of shears or a small saw will work fine. I used wire cutters. Took a while though.
Radiator and fans:
Use the stock stuff from the wagon. Go ahead and pull it all out before you pull the motor, you will appreciate the extra room when you get to removing the accessories.
Radiator hoses:
Lower radiator hose from A6, upper radiator is a custom job. I cut a section out of the Z6 hose to make it fit. Eyeball it and do your best.
Air Conditioning:
Yeah, the RT had A/C, and yes, you can keep it. Pull the mounting bracket off of the A6 motor, and it will bolt right onto the Z6 motor. Then your A6 Compressor will bolt right up to the mounting bracket. You don't even need to remove the lines, you can do the whole swap with the compressor in the engine bay. Just set it aside, lay it over where the radiator and fans used to be.
Power Steering:
I'm working on this one. If you use the wagon PS bracket, 3 of the bolts will line up, but the fourth bolt didn't line up for me. This is the bolt that attaches to the engine mount bracket. Kind of puzzled me, but the 3 remaining bolts should hold it in fine, and mine seems to line up. The other problem is the Wagon pump uses a single rib belt, and the Z6 crank pulley uses a 4 rib belt.
I have been informed that you can swap the A6 pulley right on to the Z6 crank. However, if you look closely, the A6 has a 3-rib alternator, while the Z6 pulley is designed for a 4-rib alternator....
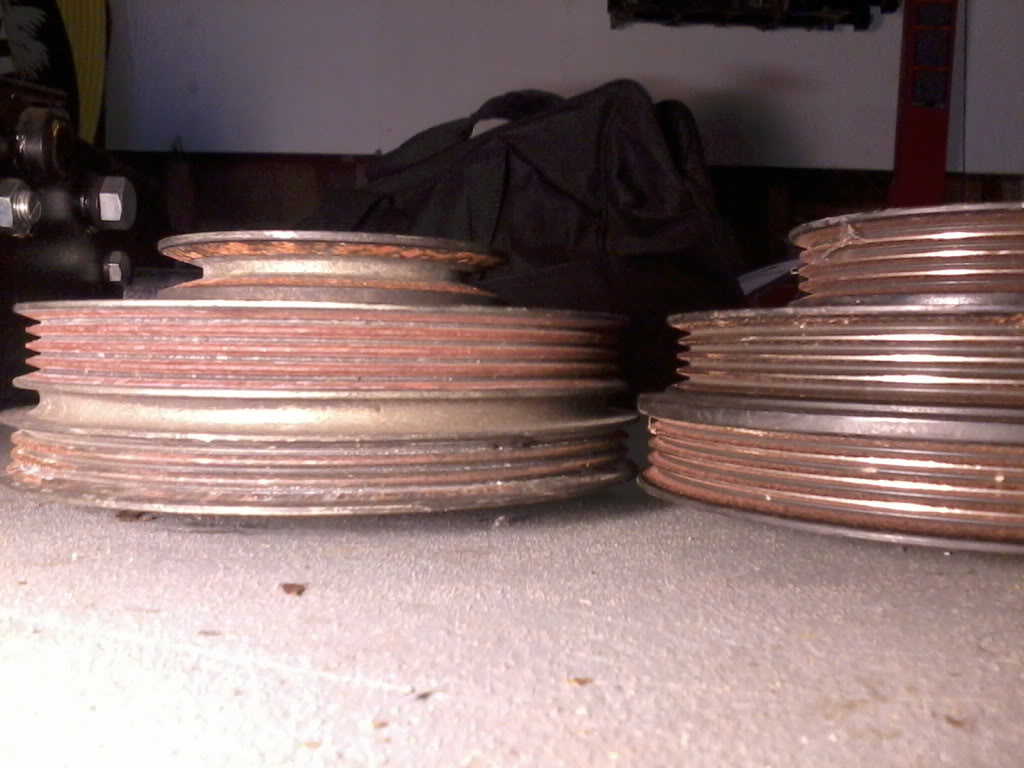
Hard to tell from this pic, but the 3 ribs closest to the block line up just fine, so you can use the A6 pulley with the 3-rib alternator belt, just make sure it's positioned on the 3 ribs CLOSEST to the alternator (if you use the Z6 alternator). As another option, you could probably just use the A6 alternator.
The pulleys on the actual steering pumps don't look interchangeable, because the center shafts are different sizes.
The pump is not directly interchangeable, because one of the lines is held on by a metal fitting and 2 bolts. The bolts are spaced differently on the Z6 pump. You would need to change the entire line to use the Z6 pump (if the z6 line is even a direct replacement) or get a custom made line, or try to cut the lines and splice them with a connector and some clamps.
As for now, I have the Wagon pump and single rib belt riding on the 4-rib Z6 pulley. It hasn't fallen off yet, but after a few days, its starting to make some noise, and it looks like its starting to wear grooves into the belt. I don't really like it, and if anyone has ideas, send them my way please.
EDIT: I'm lazy, and I'm STILL running the single rib belt on the 4-rib pulley. So far, the only issue i have is that sometimes, when it's cold out, it squeaks while trying to turn the wheel at very low speeds, until she gets warmed up.
OK! I think that's about it. If you have any questions, please feel free to ask me. I am glad to help out wherever I can. Also, if you notice any spelling errors, or incomplete or incorrect information, let me know.
THANKS!
-Doug
My goal here is to point out all of the interface problems I didn't seem to find, and also bring all of the other scattered info together in one post, so anyone who wants to do this swap in the future can quickly and easily find all of the info. Perhaps we can get this thread added to the quicklinks sticky. Yes, I know there is a link in there for D-series swaps, but that thread is about which engines will work. Mine is specifically about the D16Z6, and what is required.
This thread specifically covers swapping a D16Z6 into a 1989 Civic Wagon RT4WD (replacing the original D16A6), and converting to OBD-1 using the P28 ECU and a jumper harness kit. I have been told you can just get on OBD-0 VTEC ecu and convert the engine to OBD-0, add some VTEC wires, etc. I haven't tried it, so its not in here.
If you have useful info to add, please reply, and I'll include it in the post!
I got a lot of useful info here but it's really spread out.
Here we go:
Z6 parts:
(Most of this should come attached to your engine, make sure its there or that you can get it somewhere else)
Engine*
ECU*
Intake manifold (with all sensors attached)*
Fuel Rail*
Map sensor*
Distributor*
Four-Wire O2 Sensor*
VTEC Solenoid & Pressure switch*
Fan Switch (on thermostat housing)*
A6 Parts:
Motor mount*
Oil pan*
Oil pickup*
Intermediate shaft*
Clutch cover*
Exhaust manifold*
Injectors*
Fuel pressure regulator*
AC compressor and bracket*
PS pump and bracket*
Crank pulley*
4WD trans (obviously)*
Starter*
Purge control*
Clutch & Flywheel*
Intake & air filter*
Throttle Cable*
Fuel lines*
Radiator & Fans*
Lower Radiator Hose*
Aftertmarket parts
OBD0-OBD1 ECU jumper harness*
Distributor plug jumpers (or re-pin the plugs)*
Add new wires for VTEC pressure switch, VTEC solenoid, and 4-wire O2 sensor *
OR
Rywire complete kit : $189 + shipping*
Needs Modification:
Map sensor Wiring*
Fan Switch Wiring*
IAT Sensor Wiring*
Upper Radiator hose*
Intermediate shaft mounting holes*
NOTE: This was performed on a USDM Wagon, so Driver side refers to the Left side, and Passenger side refers to the Right side (when seated in the car).
Engine:
D16Z6 (1.6L SOHC VTEC) from 92-95 Civic Si / EX, 92-95 del Sol Si.
I used a JDM D16A, basically identical to the Z6. I was running this in my del Sol for the past 7+years, it was a direct replacement for the Z6 with no modification required. If you notice any differences that I may have overlooked, please let me know and I will add them to this section.
Transmission:
You will obviously need to use the original 4WD transmission for this swap. There is no other trans that you can use as far as i know.
NOTE: You will have to pull the engine and transmission out of the car together, and drop them back in together. there simply isn't enough room to separate them in the car, or remove them separately. Also, the oil pan and the clutch cover can only be removed or installed with the transmission removed from the motor. Yes, this means you will have to pull the entire engine/trans any time you need to do an oil pan gasket, so do it right the first time.
Clutch and Flywheel:
Info Here
Basically, match the clutch and flywheel to the transmission. Some years have different flywheels and clutches, specifically the 1988. Here is a list of the actual differences:
UPDATE: ok here's a little more info do explain the differences in clutch / flywheel setups...
From my memory, Civic / CRX / Wagon all use the same clutch & flywheel setups within each specific year, except the 4WD trans uses a different throwout bearing (or release bearing, whatever you prefer to call it)
ANY d-series flywheel will bolt to ANY d-series engine. The differences are in the Transmission's Input shaft (number of splines varies) and the surface area of the pressure plate / clutch disc / flywheel. The overall diameter of the flywheel is the same, and the tooth count is 109 on all of them.
I gathered these numbers from honda-tech, DSO, and several other sites.
1988 = 21 spline mainshaft, 190 mm disc
1989 = 20 spline mainshaft, 200 mm disc
1990-2000 = 20 spline mainshaft, 212 mm disc
If your transmission is an 88, you HAVE to use the 88 clutch/pressure plate/flywheel setup.
If you have the 89, you can use any setup from an 89 or any 90-00 as long as you MATCH THE CLUTCH DISC/PRESSURE PLATE/FLYWHEEL together. (example, you can put any 90-00 clutch disc / pressure plate / flywheel into an 89 if all 3 parts are from the same year, but you can't mix and match parts between the 89 style and the 90-00 style. 91 clutch disc will not match with 89 pressure plate, etc)
I've tried to make this as clear as possible, but if you have any questions specific to your year transmission, and what will or won't fit, shoot me a PM and I'll try to help you clear it up.
I have an 89, and I happened to have an ACT clutch and flywheel in my 93 del Sol. ACT's website lists the same part numbers for 93 del Sol and 89 RT4WD Wagon. I used the del Sol flywheel / clutch / pressure plate and so far I have had no issues to report. They seem to be working just fine, the only difference is a little extra pedal effort.
Clutch Cover
This is the plate that covers the lower portion of the transmission. It bolts onto two of the oil pan studs, and has one bolt in the middle of the bottom that threads into the transmission casing. You need to use the one from the A6 to clear the intermediate shaft. Be sure you put this on the engine BEFORE you attach the transmission, and then add the last bolt afterwords. You CAN NOT get this shield in or out with the transmission in place! (oops)
Intermediate Shaft:
The RT4WD uses equal length front driveshafts, with an intermediate shaft on the driver side. This intermediate shaft bolts to the back of the engine block. There is much discussion about which blocks do or don't have the holes for mounting the shaft. My engine (and most Z6's it seems) had only one hole already drilled and tapped. The other two holes were incomplete, I guess they're just guide holes.
Here's a pic of the location. You will need those three holes which have no bolts installed in this pic. One is just beside the oil filter, and the other two are just below it. Photo was borrowed from bam-bam.
If this is the case, you will need to drill and tap them. The bolts to hold the shaft have M10 x 1.25 threads and a larger 12mm shoulder just before the head. The way to do it is, drill the small hole, then the shoulder section, then tap the smaller hole. You would tap the threads last so you don't damage them while drilling the shoulder area.
If you know someone who is more experienced than you with drilling, and you trust them to work on your engine block, I would suggest you get their help. I had my dad come over and help, he has lots of drilling experience. I had him drill while I watched from different angles to make sure he was drilling straight.
The smaller hole, for the threaded section, will need to be drilled with an 11/32" drill bit. The shoulder area uses a 1/2" bit. The tap size is M10 x 1.25. Make sure you have good quality drill bits and taps, and drill them STRAIGHT! I suggest getting an engine stand to hold the engine still. if you try this with the engine just laying on the floor or on a tire or whatever, it's most likely going to move around.
Do not drill too deep! You will end up drilling right into the internals of the engine. Take your bolts, and slide them into the holes on the intermediate shaft mounting plate. Hold your drill bit up beside the threaded section of the bolt that is sticking out of the back, with the pointed end of the bit agains the shaft's plate. Temporarily mark the drill bit at the end of the bolt. This is how far the bolt needs to go into the block. You will need to drill a little DEEPER than this, because the pointed end of the drill bit won't cut a complete hole, and also most taps are tapered for the first couple of threads, and the bolt wont thread onto partially cut threads. Now starting at your temporary mark, hold up your tap beside the drill bit, and look at where the tapered section ends and you get fully cut threads. You may want to add about one or two threads to this distance to be sure, and then mark this part of the drill bit. Grab some electrical tape and wrap it at this point, to give you a stopper, so you don't drill too deep.
Before you drill, compare the marked drill bit to the bosses on the block. You can hold the bit up beside the bosses and compare the depth. You should still have plenty of room.
Get a center punch and do your bast to find the dead center of the holes. Make very light marks and then check them from several angles. Once you are sure about it, give it a nice solid center punch to guide the tip of the drill bit.
Just take it nice and slow and make sure you are drilling straight.
When tapping, reverse the tap every 1/4 to 1/2 turn. this will break off the metal shavings from tapping, and prevent them from jamming up in the tap. You may need to stop, remove the tap and clear the debris out of the hole every once in a while.
You will probably need the oil filter removed to tap one or 2 of the holes, MAKE SURE YOU COVER THE AREA WITH A RAG! There will be LOTS of metal shavings. I used a vacuum to clean the shavings as we were drilling and tapping. Just be careful not to suck up your rag!
If you are worried that you don't have the room, or you realize you didn't drill far enough when you are done, you could probably add a washer or two to the bolt to snug it up. I didn't need to, you should be fine.
Starter:
Use the Wagon starter. When you are ready to drop the motor and trans back in the car, put the starter on while its still out of the car. it makes it a hundred times easier.
ECU:
P28 (OBD-1 VTEC) from 92-95 Civic Si / EX, 92-95 del Sol Si. You will need an OBD0-OBD1 Jumper Harness to make it work, or you can try to re-pin the ECU plugs on your own. Yeah. Have fun with that.
I bought my conversion wiring kit from Rywire.com, they sell a whole kit with ECU jumper, Distributor jumpers, and an extra subharness with the plugs for the VTEC Solenoid, VTEC pressure switch, and 4-wire O2 sensor. It is literally plug and play, you just have to run the subharness through the firewall. I cut a slit in the rubber boot around the main harness and fed the subr\harness through there. There are 2 loose wires on the subharness for the Check Engine light switch. there are instructions on the Rywire site about this switch and everything else about this wiring conversion.
I paid $189.00 plus shipping. It was worth every penny.
Intake:
Use the stock intake from the A6, or an aftermarket intake for the wagon or a Civic/CRX. I got one out of my friend's 90 hatch, and it fits on the throttle body and clears the battery. If your battery is relocated, you can use a straight style intake from just about any Civic.
Intake manifold:
The easiest solution is to use the manifold attached to your Z6. (You could prob use the A6 manifold, but you'll have to swap them and probably get a new gasket. I'm not sure about the size of the throttle body, but everyone says the Z6 manifold flows better) As for the sensors and other items attached, here's the rundown:
NOTE: when removing the old engine, BE SURE TO MAKE A NOTE OF WHAT SENSORS GO WHERE!!!! A few of the plugs are the same, and can easily get swapped around. (example: TPS and MAP, and IACV and IAT) Get some masking tape and a Sharpie, and label everything. Plugs, hoses, ground wires, etc... This will save you many headaches.
Throttle Position Sensor (TPS):
No modification needed. Plug this part of the harness into the TPS on the Z6 manifold. Ta-da!
Map sensor:
The Z6 MAP is on the top of the throttle body, and the A6 MAP is on the firewall. I'm pretty sure you can use either one, I used the Z6. The plug won't reach the throttle body from the firewall, so you need to clip the zip tie that holds it there, and gently pull the MAP wires out of the loom (you may need to remove a little electrical tape on the loom itself), all the way back as far as you can, near the passenger side shock tower, where the whole thing is taped together. This should give you enough length to run straight across, over the intake tube, to the throttle body. If you need more length, unbolt the bracket that holds the wiring harness to the shock tower, and just lean it towards the throttle body. Once you are satisfied with the length, cover the MAP wires with electrical tape to protect them and keep it looking clean, and also add a little tape to the loom it came out of, so it doesn't fall off of the wires that remain in it. Alternately, you can use the original MAP sensor on the firewall, and tie the vacuum line into an existing one by cutting and splicing in a plastic t-fitting.
Purge Control Solenoid:
A6 is on firewall, Z6 is on the manifold. They use different wiring plugs, so the simplest way to do it is to use the A6 solenoid, and just plug the vacuum line into the correct location on the Z6 manifold. You may need a slightly longer vacuum line.
Fast Idle Valve:
The A6 intake manifold has the Fast Idle Valve on the rear of the manifold, on the drivers side, and it has an electrical connector. The Z6 Fast Idle Valve is under the throttle body, and does not have a plug, because it is not controlled by the computer, but by coolant temp. The OBD-1 ECU doesn't need it, so you can leave that plug on the harness unplugged. I actually cut the wires off of the harness, and off of the Fast Idle Valve itself, and used the extra wire to extend the wires for the IAT sensor.
Intake Air Temperature (IAT) Sensor:
The sensor and the plug are the same, but due to the location, the plug on the A6 wiring harness won't reach the sensor on the back of the Z6 intake manifold. You will need to cut and extend these 2 wires. Since I didn't need the wires for the Fast Idle Valve, I used those to get some extra length. If you want to do the same, cut the wires as close to the Fast Idle Valve as you can, and trace them back to the plug on the harness. Leave the plug together, and continue to follow the wires all the way back to the main harness. This should give you enough additional length. Make sure you measure it before you cut, just to be sure. When you are sure you have enough length, cut the 2 wires. Next, find the plug for the IAT, and cut the wires at least a few inches away from the plug, so you have some room to work with. You will have to strip the wires and if you screw it up, its better to have a few extra inches to try again. Strip all the wires, solder in the extra wires from the unused section of the harness, and shrink wrap it. PAY ATTENTION and be sure you have it wired up right. The extra section of wires will have different colors. For example, if you connect the red wire to the blue wire, then the other end of the blue wire must connect to the other section of red wire. If you don't want to cut the extra wires out of the harness, or you think you may convert back to the A6 at some point, then you can go buy some extra wire to use instead.
Throttle cable:
The original A6 throttle cable on your wagon will connect to the Z6 manifold just fine. You will need to re-adjust it most likely, and this is simple. Loosen the adjustment nuts, pull the cable back so there is just the tiniest bit of play, and tighten the nuts. I usually take as much play out of the cable as I can, just don't overdo it, or it will hold the throttle open slightly.
Vacuum Lines:
Pretty simple. Nearly everything is the same. There are five vacuum lines connected to the Intake Manifold. There's a large line to the brake booster, another to the PCV Valve, one line between the manifold and the fuel pressure regulator, one from the manifold to one nipple on the Purge Control Solenoid, and a line from the top of the throttle body to the charcoal canister. The Z6 will not have the feed for the line to the MAP sensor on the firewall, because the MAP sensor is actually attached to the throttle body. So if you are using the A6 MAP on the firewall, splice its hose into any other with a t-fitting. Otherwise, use the Z6 MAP and don't worry about the vacuum lines on the A6 one. Just tuck them away or yank them out.
The charcoal canister will have 3 lines coming out of it. One is a rubber hose that routs back through the firewall. the other two are located right on top of one another. The bottom hose is usually braided with some kinda red fabric crap, and it runs to the nipple on the top of the throttle body. The top hose is a simple rubber vacuum line, and it runs to the other nipple on the purge control solenoid. On my canister, the fitting for this line was marked with "PCV" (purge control valve, i assume).
For those of you that like diagrams, I made this in my spare time.
Positive crankcase ventilation (PCV) valve:
A large vacuum hose runs from the intake manifold to a valve situated between the runners, and then to the breather box on the back of the block. As long as you left the Intake manifold on the engine, this will all be good to go.
Idle Air Control Valve (IACV):
The plug on the IACV attached to the Z6 manifold is the same as the plug on the engine harness, just plug it up and you're good to go.
Injectors:
Install the A6 OBD-0 injectors in the Z6 manifold. They will work just fine with the Z6 fuel rail, and they will plug right up to the harness.
Fuel rail:
I used the Z6 because it looks better in my opinion, and everything bolts up to it just fine, other than the harness for the injector plugs. No big deal. You could probably unclip the plastic cover on the harness and use the cover from the Z6 so it attaches to the rail if you wanna get really anal about it. The A6 fuel rail might work, depends on whether or not the studs line up. I never checked it, so I can't tell you for sure.
Fuel pressure regulator (FPR):
Use the A6 version. The feed for the fuel return on the Z6 unit is actually smaller than the return line in the wagon, and may cause leaks.
Fuel lines:
Just use what's already in the wagon. Should work just fine.
Distributor:
Use the OBD-1 distributor for the Z6. You can either get extra plugs off a donor car, and re-pin them yourself, or buy jumper plugs. I bought jumper plugs, and it literally takes 3 seconds to install. I highly recommend it.
O2 Sensor:
Since we are converting to OBD-1, you need the 4-wire O2 sensor (unless you are running a chipped ECU with the O2 bypassed). It will fit right into the stock A6 wagon exhaust manifold, but you will have to either install some extra wires to run back to the ECU, or you can order a subharness that will add the needed wires and plug, and run them back to the ECU. I can't stress this point enough, I REALLY recommend you buy a wiring conversion kit. At least two thirds of all swap problems are wiring related, and a good quality kit will literally plug right in, eliminating the chance that you screw something up, and saving you several hours of wiring and soldering and shrink wrapping.
VTEC Solenoid and VTEC Pressure Switch:
These should come attached to your Z6 motor. Located on the solenoid housing (rear passenger side of the head), one plug has 2 wires, the other has one. Either add the plugs and wires yourself, or get the kit.
Fan Switch:
The A6 fan switch is on the back of the block, above the oil filter, abd the Z6 switch is on the thermostat housing. They use TOTALLY different plugs, and the wires won't be long enough to reach. Go to the junkyard or find a donor car (92-95 civic/del sol, some accords work as well. anything with the right plug and enough wire attached). Find the green plug for the fan switch on the thermostat housing, and unplug it. Start removing tape and separating the wires from the harness. Get as much wire as you can with it. You only need about 9 inches or so, but get extra just in case. Now grab the harness from your wagon (all of the wiring stuff is easier to do with the harness out of the car and off the engine) and find the plug for the fan switch. It's actually two single push-on plugs with a big rubber boot covering them. Cut the wires and get rid of the boot and the plugs. Strip the ends of the wires, and do the same to the wires on the new fan switch. From what I have read, it doesn't matter which wire goes to which, but I believe they were the same colors, so I just matched them up. Connect, solder, shrink wrap, done.
Exhaust:
The original A6 manifold from the wagon will work, and will clear the transfer case and oil pan. The Z6 manifold will not clear them, neither will any 4-2-1 manifold for the Civic or CRX that I know of. It seems no one makes an aftermarket header for the RT4WD, you need to make something custom if you want one. I haven't spent much time looking into this, but I know there is info on this forum, and there are a few members who have come up with their own solutions. Until I get time to research this more, start with the link below. There are a few names in there of people who have done it.
Start here
There is very little room to get the header in and out with the engine installed, even with the radiator and fans removed. The easiest way is to just loosen the nuts(soak them in PB Blaster for a while so they don't seize up and snap the studs), pull the manifold out with the motor, then remove it afterwords. Install it onto the Z6 motor before lowering it into the car, or you will have a pain getting it in later.
The catalytic converter and the rest of the exhaust pipe will bolt right up to the stock manifold.
Oil pan:
You have to use the A6 oil pan from the RT4WD wagon, its the only one that will clear the transfer case. You can try to dent up your Z6 pan, but it's going to take a lot of work, and you risk warping the mating surface, and causing oil leaks. If the pan leaks, you have to remove the entire engine and transmission to get the pan off. Do it right the first time, use the A6 wagon pan. It's a direct fit, no modification required. Go ahead and get a new gasket, and pop some gasket sealer on it to be sure, especially around the crankshaft.
Oil pickup:
VERY IMPORTANT! You MUST use the pickup that matched your oil pan! Since we are using the A6 wagon pan, use the A6 wagon pickup. I believe some other pickups can be used, I will look into this. YOU CANNOT USE THE Z6 PICKUP WITH THE A6 PAN!!!! Trust me, the pickup will be pressed against the pan, and will not be able to pickup the oil. It's very easy to swap them, and its a direct fit.
Motor Mounts:
Since we are using the 4WD trans, and 3 of the mounts bolt to the trans (the rear mount, side mount, and the front torque mount), all we need to worry about is the driver side engine mount. Use the original RT4WD Wagon mount and the bracket that bolts to the block. There are two bolts that hold the bracket onto the block, and to get to them, you will have to remove the timing covers. In order to get the lower timing cover off, you will need to remove the crank pulley. Yeah, its a pain in the ass if it hasn't been removed in several years.
You will need to trim a little bit of the upper and lower timing covers to clear the new mount bracket. Bolt up the bracket, then hold the covers up to it and eyeball what needs to come off. It's not a lot, and a good pair of shears or a small saw will work fine. I used wire cutters. Took a while though.
Radiator and fans:
Use the stock stuff from the wagon. Go ahead and pull it all out before you pull the motor, you will appreciate the extra room when you get to removing the accessories.
Radiator hoses:
Lower radiator hose from A6, upper radiator is a custom job. I cut a section out of the Z6 hose to make it fit. Eyeball it and do your best.
Air Conditioning:
Yeah, the RT had A/C, and yes, you can keep it. Pull the mounting bracket off of the A6 motor, and it will bolt right onto the Z6 motor. Then your A6 Compressor will bolt right up to the mounting bracket. You don't even need to remove the lines, you can do the whole swap with the compressor in the engine bay. Just set it aside, lay it over where the radiator and fans used to be.
Power Steering:
I'm working on this one. If you use the wagon PS bracket, 3 of the bolts will line up, but the fourth bolt didn't line up for me. This is the bolt that attaches to the engine mount bracket. Kind of puzzled me, but the 3 remaining bolts should hold it in fine, and mine seems to line up. The other problem is the Wagon pump uses a single rib belt, and the Z6 crank pulley uses a 4 rib belt.
I have been informed that you can swap the A6 pulley right on to the Z6 crank. However, if you look closely, the A6 has a 3-rib alternator, while the Z6 pulley is designed for a 4-rib alternator....
Hard to tell from this pic, but the 3 ribs closest to the block line up just fine, so you can use the A6 pulley with the 3-rib alternator belt, just make sure it's positioned on the 3 ribs CLOSEST to the alternator (if you use the Z6 alternator). As another option, you could probably just use the A6 alternator.
The pulleys on the actual steering pumps don't look interchangeable, because the center shafts are different sizes.
The pump is not directly interchangeable, because one of the lines is held on by a metal fitting and 2 bolts. The bolts are spaced differently on the Z6 pump. You would need to change the entire line to use the Z6 pump (if the z6 line is even a direct replacement) or get a custom made line, or try to cut the lines and splice them with a connector and some clamps.
As for now, I have the Wagon pump and single rib belt riding on the 4-rib Z6 pulley. It hasn't fallen off yet, but after a few days, its starting to make some noise, and it looks like its starting to wear grooves into the belt. I don't really like it, and if anyone has ideas, send them my way please.
EDIT: I'm lazy, and I'm STILL running the single rib belt on the 4-rib pulley. So far, the only issue i have is that sometimes, when it's cold out, it squeaks while trying to turn the wheel at very low speeds, until she gets warmed up.
OK! I think that's about it. If you have any questions, please feel free to ask me. I am glad to help out wherever I can. Also, if you notice any spelling errors, or incomplete or incorrect information, let me know.
THANKS!
-Doug
Comments
Yes I did. I spent two weeks researching, then about two weeks in my spare time doing the actual swap. I had so many problems, I had to pull the motor back out twice because things didn't work right.
I hate to see anyone else go through all the trouble I did, so I spent like three or four days gathering all the information I could and writing down all the problems I had, and put it all together in one place. Everything in this guide is from my own personal experience, no speculation involved. Just straight up FACTS.
My pump doesn't look crooked... Did the same three bolts line up on yours, or did the bolt to the motor mount actually line up?
Agreed. My camera totally puked, or else I would have taken some. Most of the stuff, you really don't need pics for. If you are mechanically inclined enough to tackle a motor swap, then you should know what this stuff looks like.
There are a few things that pics would be really nice for, such as the vacuum hose setup, the connectors and wires you have to add / extend. If anyone has photos that can help, let me know!
I just dug up the photo of the intermediate shaft holes, and added it to the original post. Thanks to bam-bam for the photo. I didn't ask, i just copied it. I hope he doesn't mind, but if so, I'll remove it.
Thanks for compiling the guide. I'll be installing my JRSC'ed Z6 in an '89 RT sometime soon, this will come in handy.
The biggest hassle I can foresee is the engine wiring harness. I don't have one at all, so I'll have to convert a DPFI one I guess.
my bracket lined up but the bolt to the motor mount was off a little
Yeah you will prob have to convert the wiring harness to DPFI. If you use obd1 injectors, you won't neede the resistor box, so that might simplify things for you a little bit. I'm pretty sure that Rywire sells a complete converted harness from DPFI to MPFI, but its kinda pricey. $350 Not sure if anyone else has them cheaper...
I'm sure I'll end up rolling my own again. The hitch is that I don't need a mpficonverted harness, I need a regular mpfi harness. I'm sure it'll all become clear once I actually put my hands on it and get started.
There's also that weird issue where the left side shock tower plug is different in the '88-'89, I think 8 pins vs, 14 in the later model ones?
Has anyone deleted the power steering from their RT? I'm strongly considering it, but I will be using oversized tires :shock: I'm not sure what kind of steering effort I'll end with.
I haven't done it, but I've been told if you don't have a manual steering rack, then the steering effort is gonna be crazy hell. I read something about removing the two power steering hoses and connecting a single line to the two outlets on the rack, to allow fluid to flow back and forth between the two ports. Supposedly that will help ease the effort. I can't remember where I read that. Probably somewhere on honda-tech.
Cool man. If you need any advice, hit me up. I'm glad to help if I can.
Bam,
Unless you're a girlie man, even with bigger tires you should have no trouble with the steering effort if you do the delete properly. The key is to dump most of the fluid out of the rack. If you're pushing the fluid around inside the rack, that's where the effort skyrockets. If most of the fluid is gone, it's not any harder than a manual rack with the same steering ratio.
I deleted power steering from my RT when I put my ZC in and couldn't come up with the correct bracket to mount the power steering pump. I connected the 3 lines together down at the rack and called it a day. It's definitely takes some extra effort below 5mph and is pretty hard when stopped but you can still turn em. Get above 5mph and you won't miss the power steering at all.
If I deleted it, I would switch in a manual rack and crossmember that I happen to have lying about. The more I think on it though, the more I think I'll try to keep it. It does clutter things up though. i was worried about interference issues with the charger.
Also similar info at
http://www.angelfire.com/d20/hcivic88/4gtech_d16z6swap.html
Haha cool! Just curious, who do you know that bought parts from me, and what did they buy?
I think I recognize your username from carolinahondas. I think we may have talked or exchanged parts or something. Or maybe I've just seen the name around. I know I've seen it. For some reason I'm thinking your name is jon? Is that right?
yeah my name is john.....im talking about wayne aka fatman489....not sure if hes bought anything from you but he did pick up a free z6 bottom end from you. im now known as john@tcs on ch.....hopefully pete will change my sn back though. i no longer work at the shop but i keep getting pm's about everything lol
Yeah that's right. I remember him saying something about ya, but man that was WAY back in the day. Wayne is a cool guy man. And ever since then he has always vouched for me whenever I'm selling something on CH.
It's cool to run into people like this. Hope you are enjoying Indiana. I have family up there. OH I saw pics of your wagon too. NICE!!!
Glad I could help. I can't say enough good things about Rywire. They make a great quality product, its literally plug-and-play, and its a small company, like 2 or 3 people. They are all very knowledgable about Honda swaps, its all they do really. If you call customer service, you get to talk to one of those actual people, and they are eager to help you out.
Its the only time I have enjoyed calling customer service!
d15b2/d16a6 top, d16z6 bottom
Pulling a z6 out of my friends old crx shell. swapping over to my rt.
went ahead and got a competition clutch/fw, gates belt, water pump, new clutch bolts, innovative mounts and a few other random new parts. then following your guide. I think i'll attempt the pulley swap since my alt on my zc is brand new. hopefully i'll have a nice update by the end of may for you guys
Also, I just updated the first post with a little more info about clutch / flywheel setups. The general rule is still "go by the year of the transmission," but I tried to explain the differences a little better and kind of point out what can or can't be switched around.
One more note, I've noticed several people mentioned that pics of this stuff would be nice. Well, I'm too lazy to search the internet for all of them. However, in the next few weeks (hopefully) I'll start pulling my motor for an overhaul and dropping it back in. I will try to take as many pics as i can while I'm at it, to go along with this guide!