Power windows and locks here I come!!!
 vtecn8ive
Senior Wagonist
vtecn8ive
Senior Wagonist
Here is my How-To for OEM power windows and power locks:
List of parts:
88-91 Civic Ex/Lx parts car
All 4 window regulators
All 4 interior door handles with window switches
All 4 lock actuators with all of the connecting rods
All 4 door harnesses and harnesses that go to the inside of the car
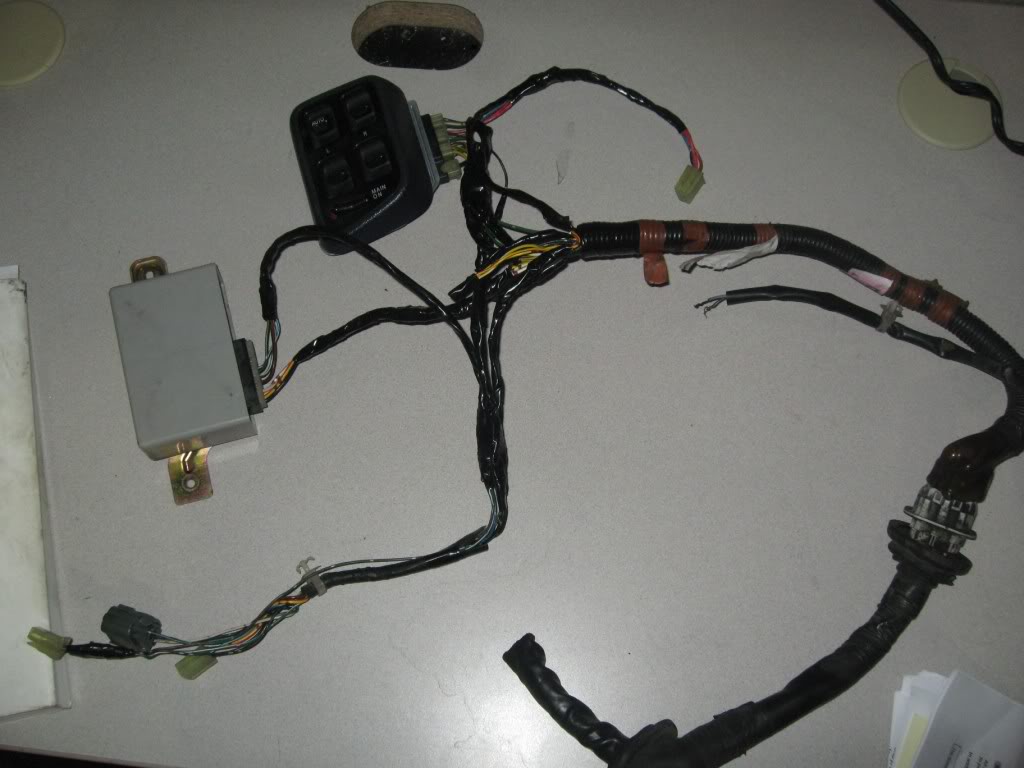
Door lock relay (located on inside of driver door)
Driver side window switch/relay
Power Window relay located near the fuse box *optional
Power Window Fuse holder *optional (nice to have)
Lots of spare wire (unless you take apart the parts cars wiring harness)
Heat Shrink
Lots of Electrical Tape
Soldering Iron
Solder
DVOM (digital volt ohm meter)
Spare fuse holder
Helms manual
LOTS OF PATIENCE.
Would I do this again, no. I have spent around a month working on this off and on (more off then on though). But it is nice to have.
Removal:
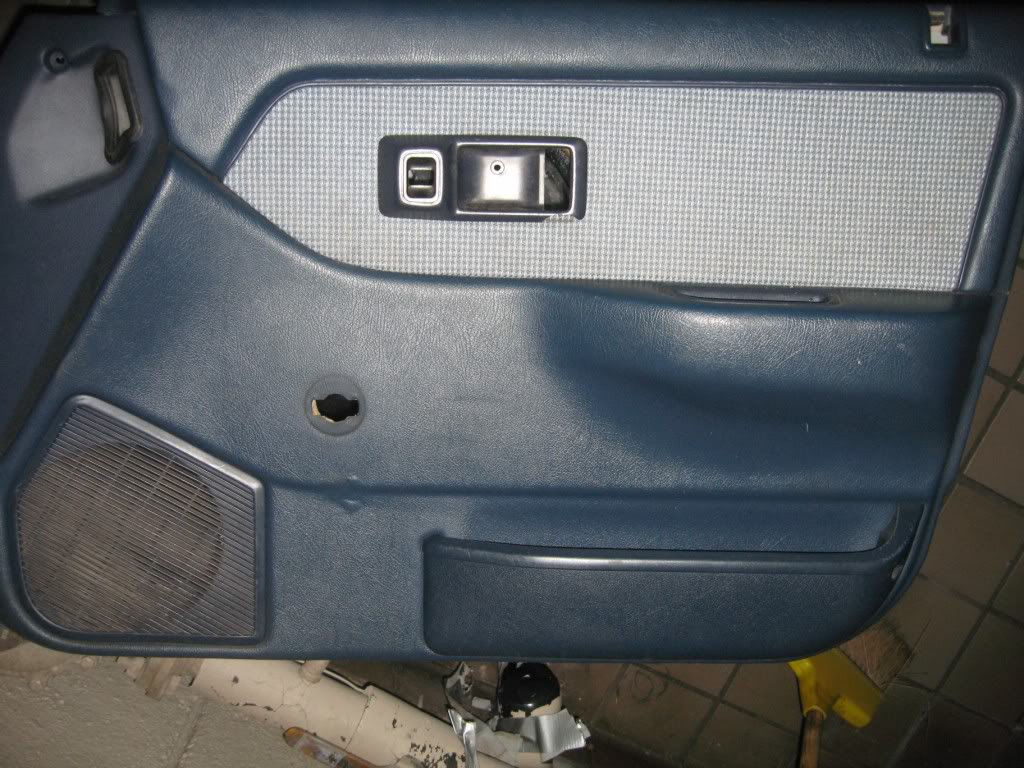
Hopefully you know how to remove the door panel. If not, 1 screw behind the interior door latch handle, 1 screw on the side of the door panel, 1 screw in the door armrest handle, **front doors have additional screw below the pouch thing). Pull the clip off of the window crank and then pull of the window crank. Take off interior door handles, and then basically pull the door panel towards you, there are clips behind the door panel that will snap off.
Next just cut off or pull the plastic off, unless you plan to reuse then try to be careful and pull it slowly (maybe use a heat source). I replaced it so I just tore it off (and recommend it :P).
Time for pics. Now time to remove the manual windows, we'll start with the easy back ones first, put the crank handle on so you can move the window up and down (you don't need to put the clip on).
Move the window towards the bottom so you can get to these bolts that hold the window on:
Remove both, I just lifted the window up and made sure it stayed snug against the window gasket, otherwise you can take the window out too.
Unbolt the following bolts:
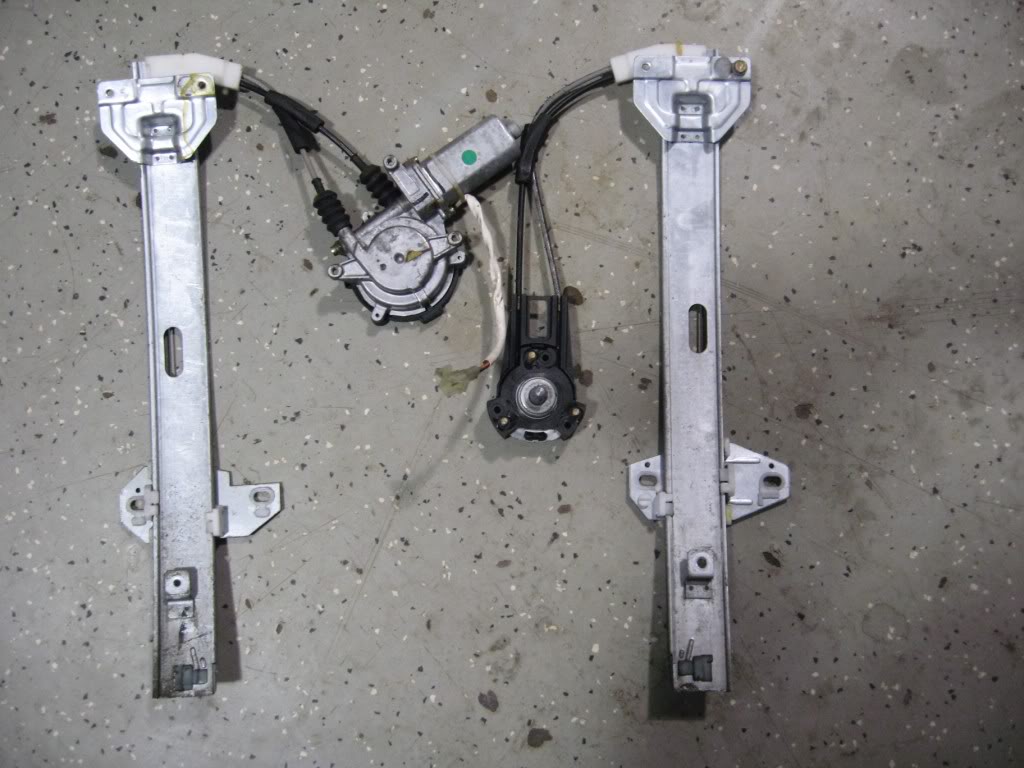
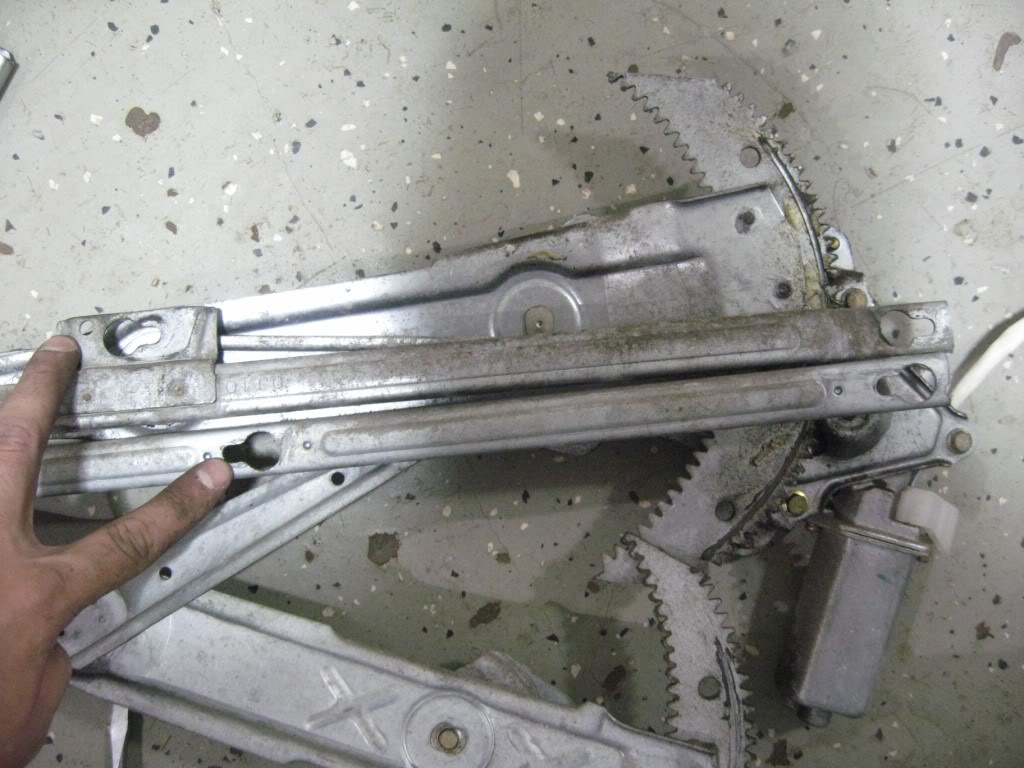
All 3 of the ones holding the regulator on:
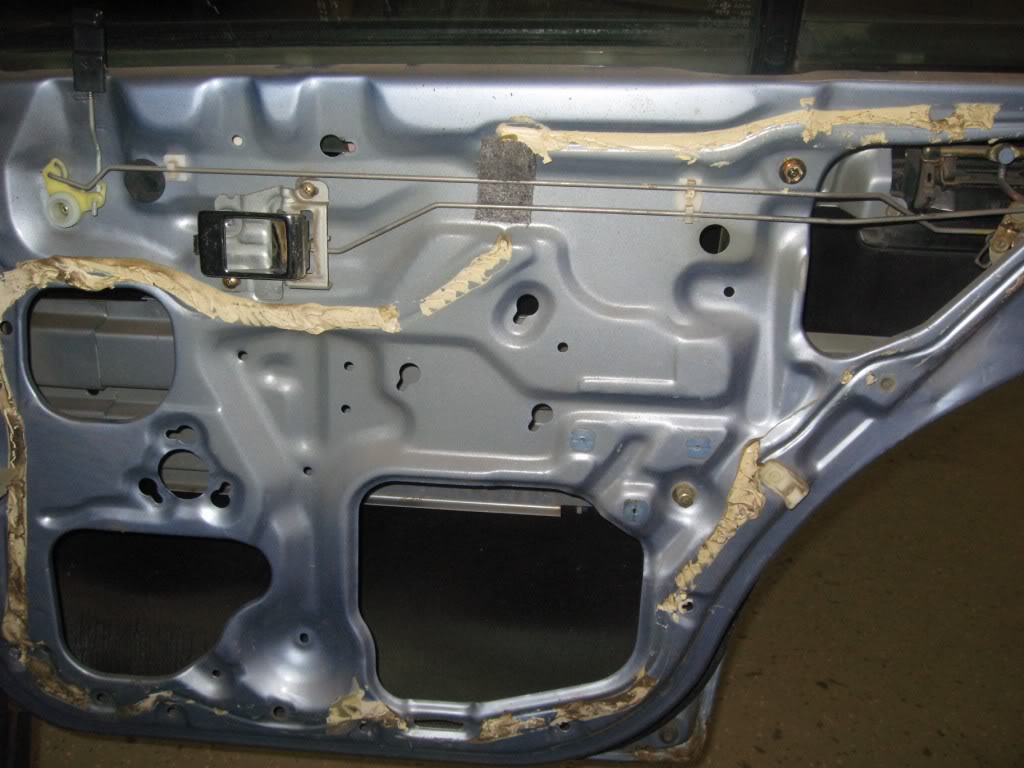
Now you should be able to pull out the regulator assembly:
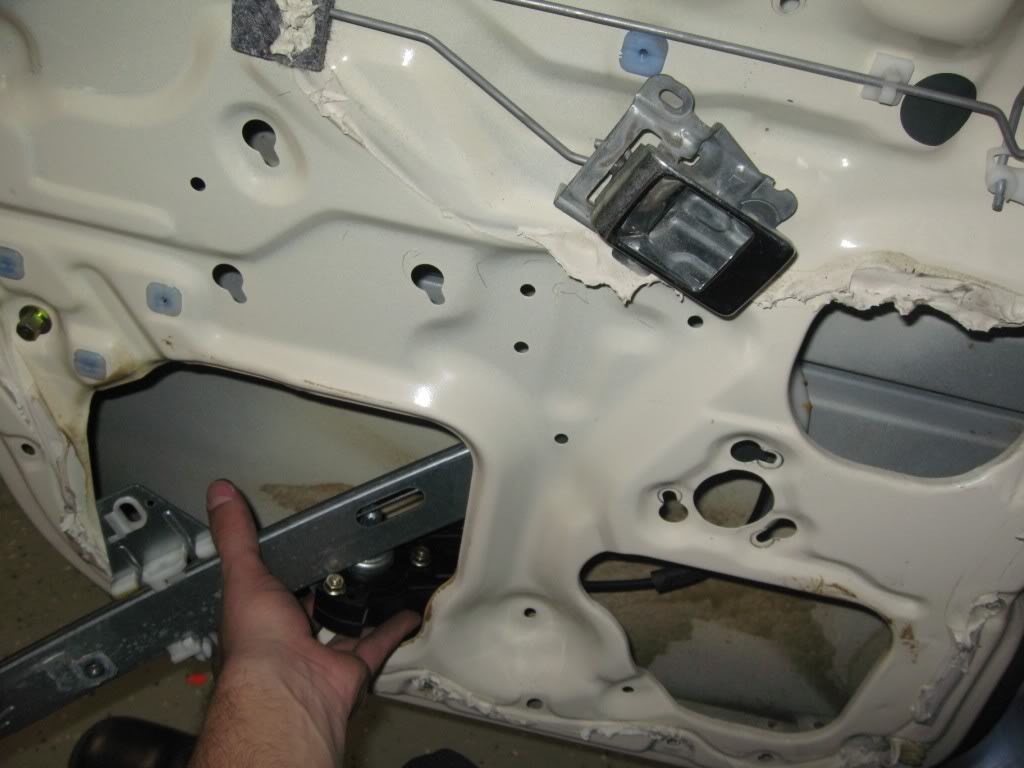
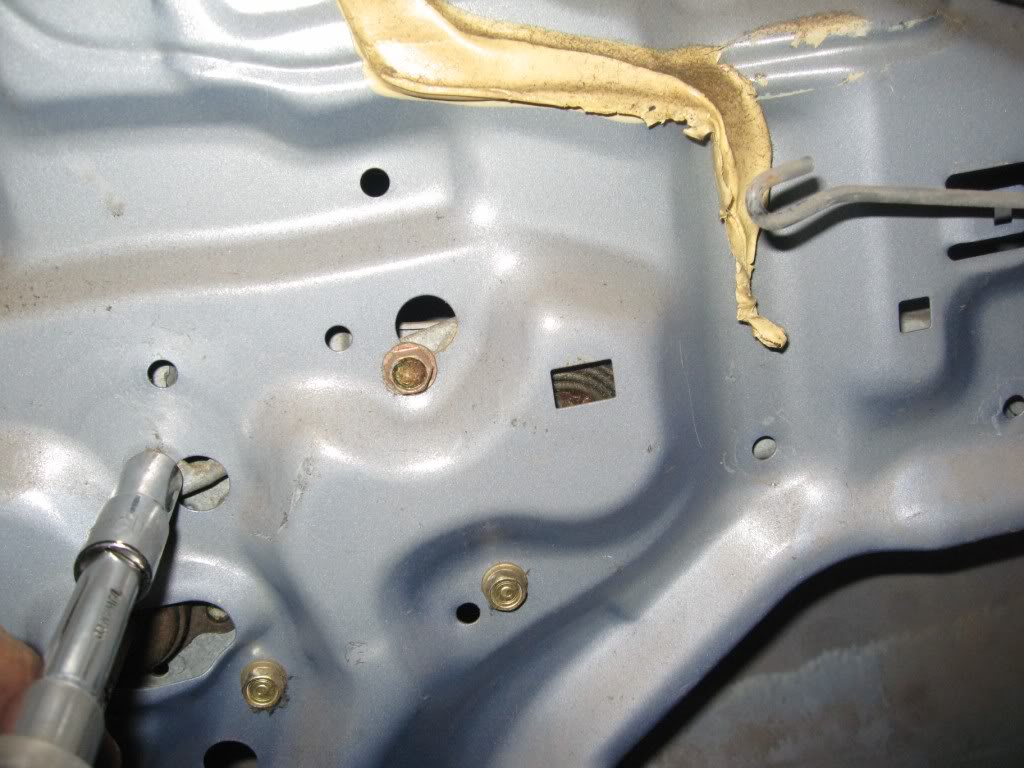
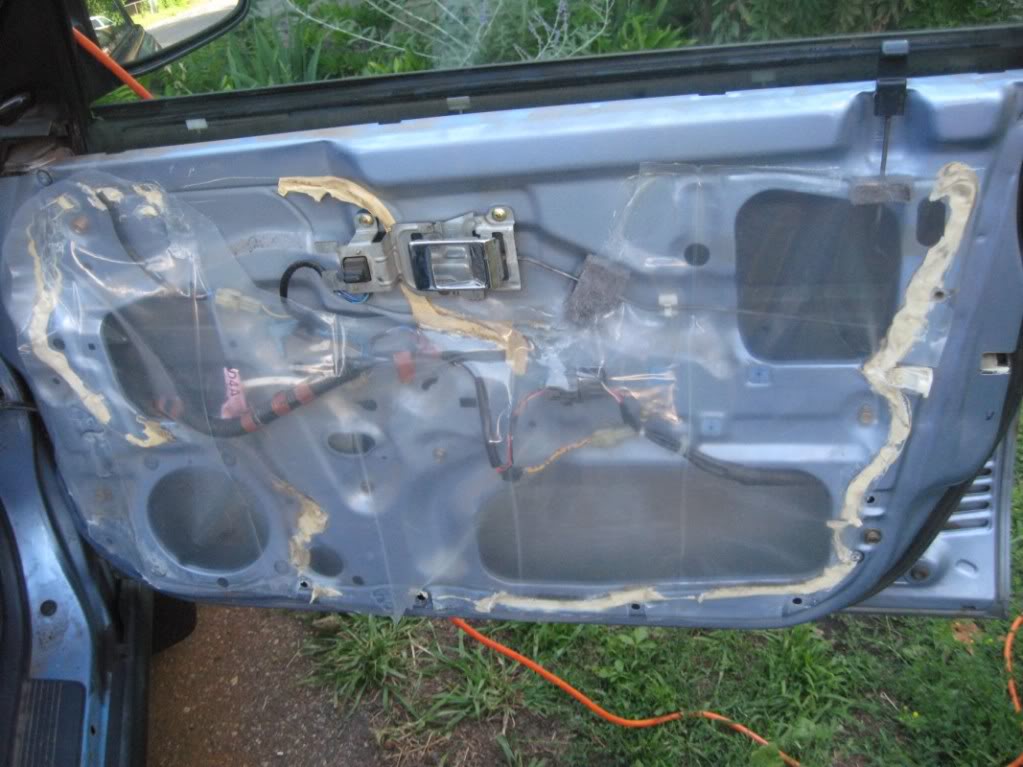
Here is the opposite rear door without the window regulator in there:
Now is the time to remove the door locks, so we will start the with rears again:
Remove the 2 screws holding the interior door handle on:
Unscrew these 3 screws:
Unscrew that big screw in the blue thing:
Using a pliers reach on the inside of the door and pinch this so it will come out, otherwise you may have luck just prying it out (i didn't want to risk breaking it):
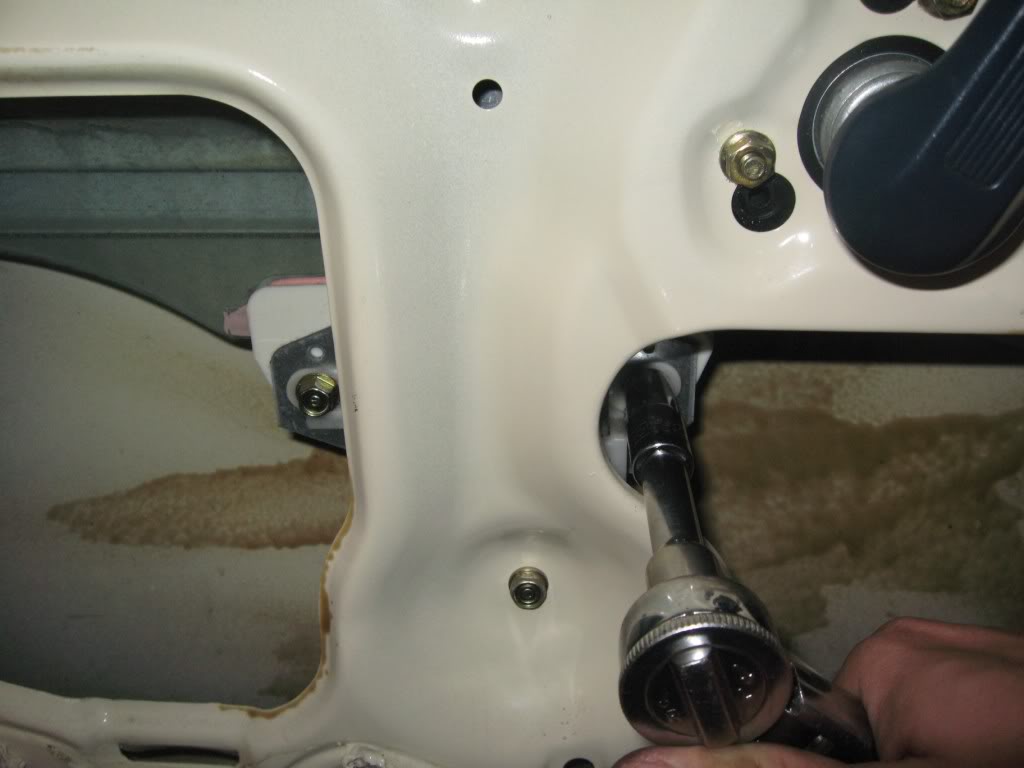
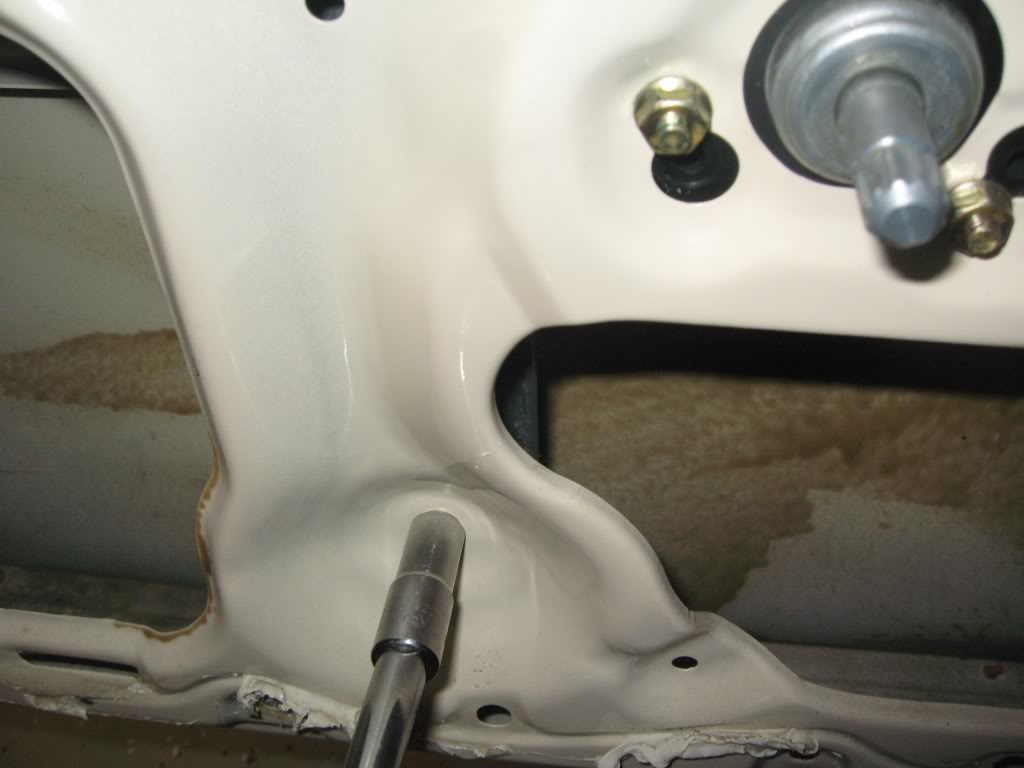
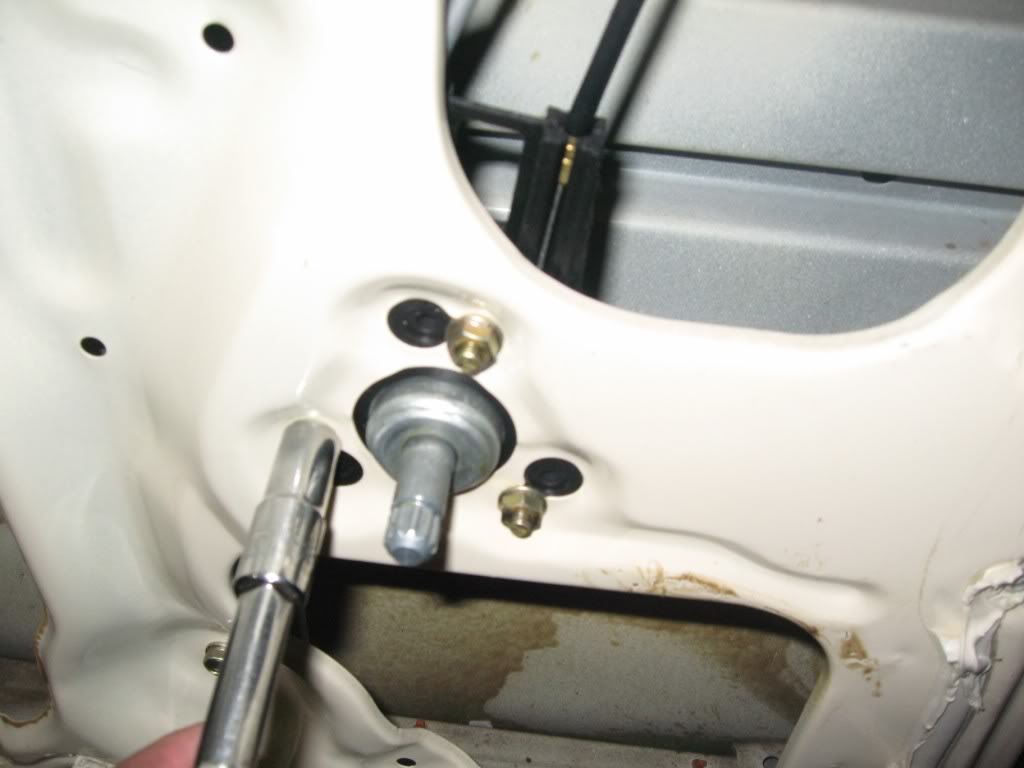
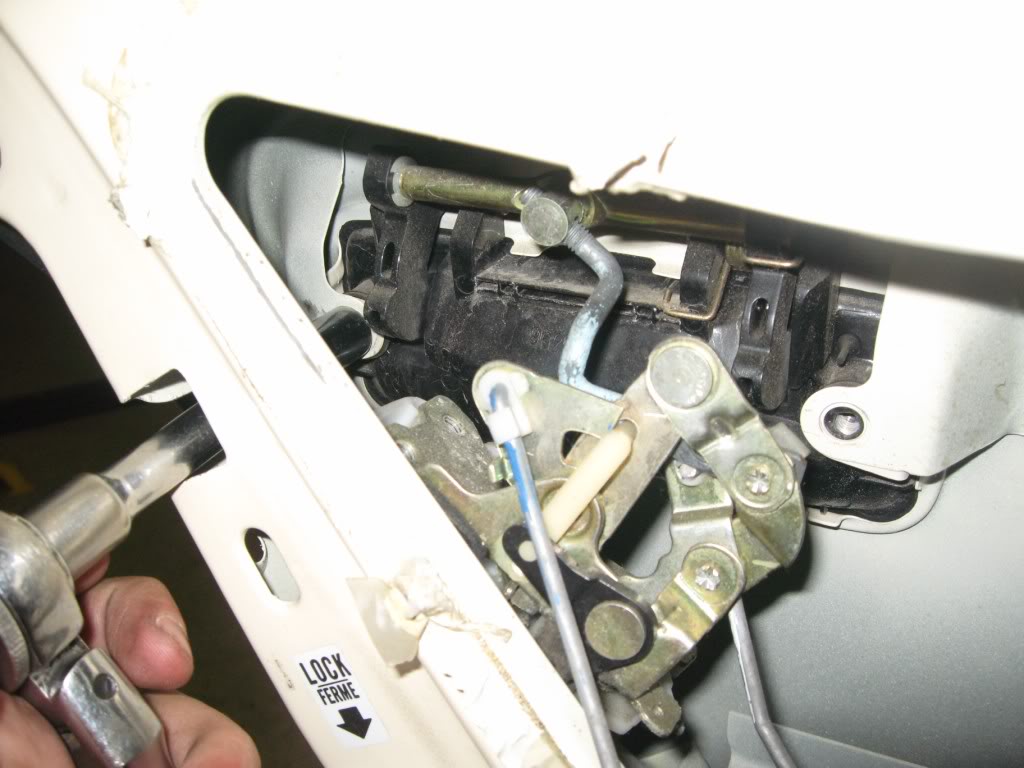
To remove the outside door handle:
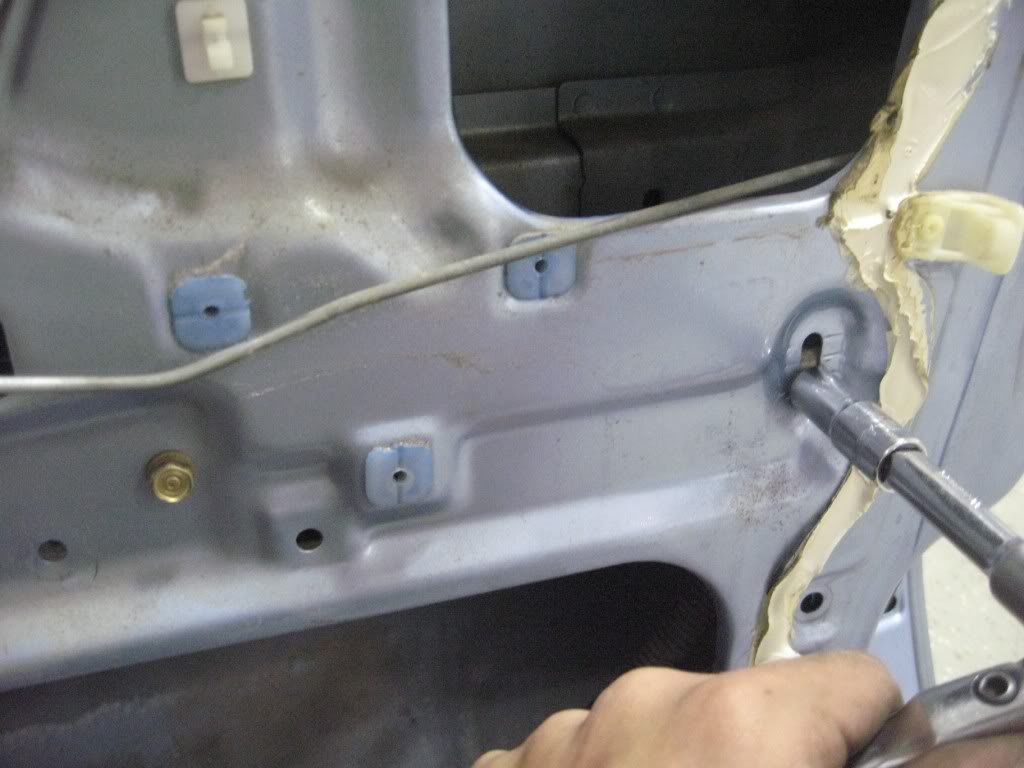
You'll need to take off the two bolts from the inside. I am pointing to one bolt with my screw driver, and the other one is visible to the right:
Here is how I do it, I move the actuator out of the way and get the difficult one this way, then just unbolt the other one that is easy to get to:
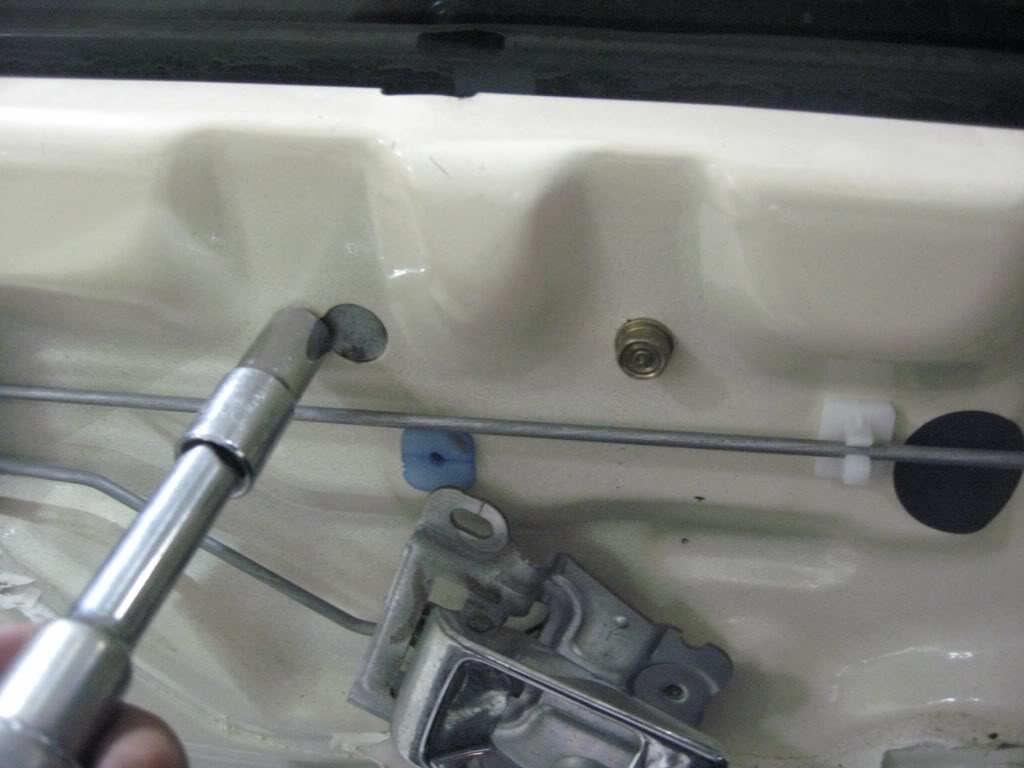
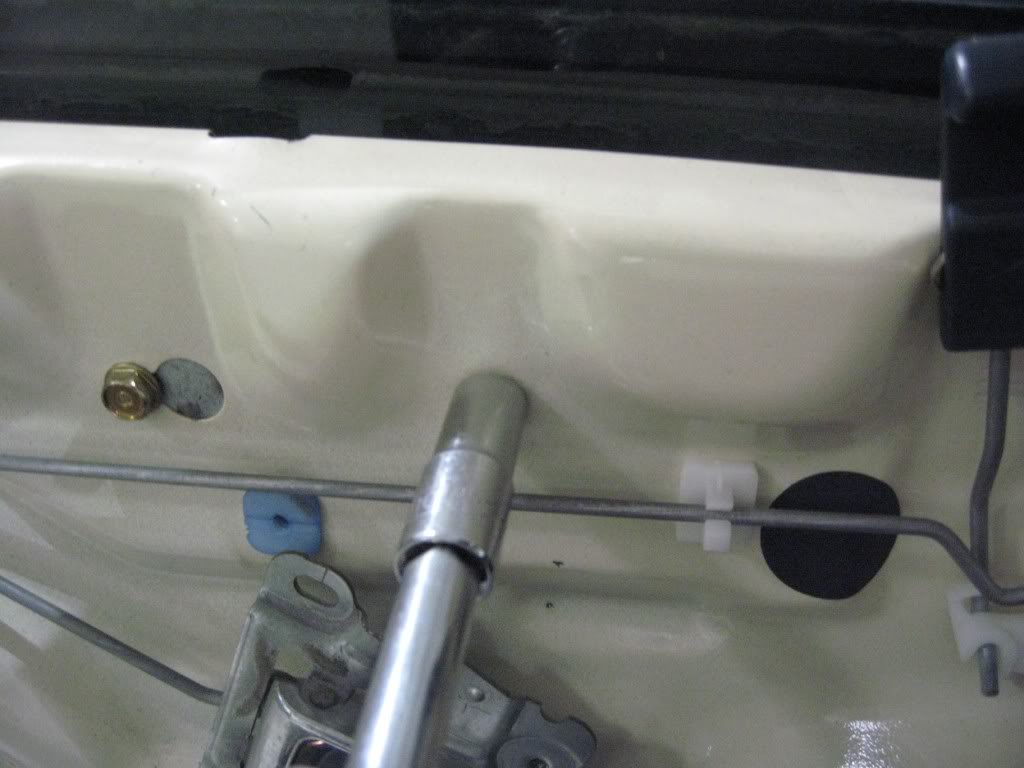
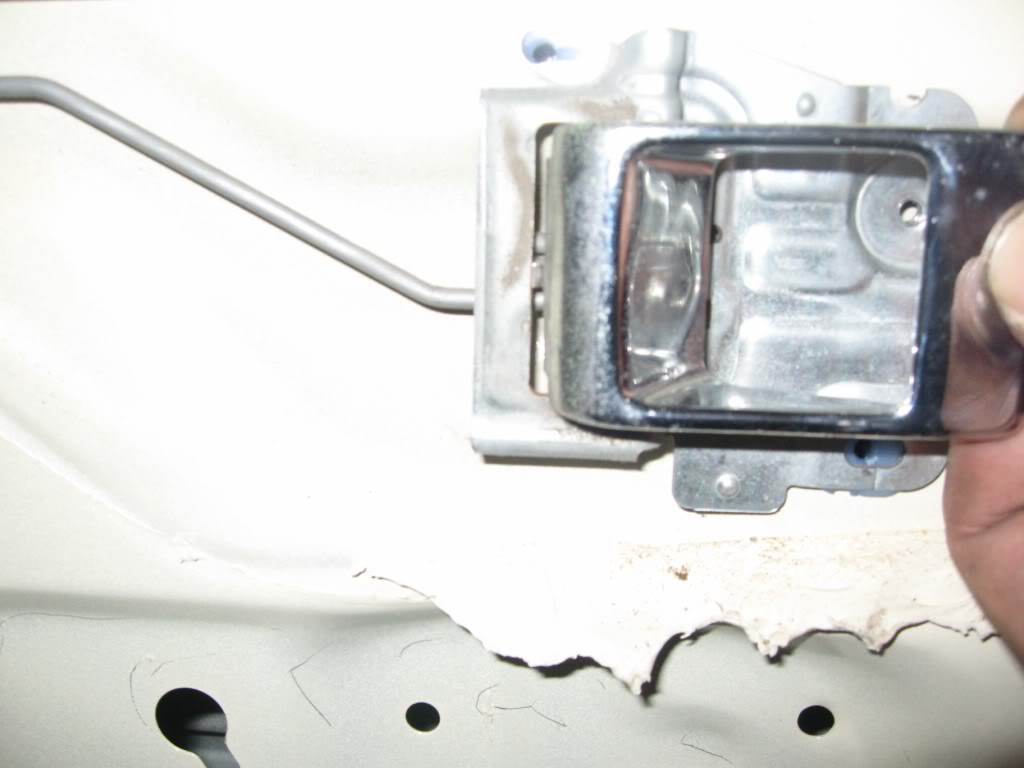
From the exterior you will want to pull the handle out and then you should be able to twist this off. Just keep twisting until the exterior door handle is off:
You can remove the actuator now, just have to snake it around and it should come out. You MAY need to remove the window guide but I can't remembe off the top of my head, if you do its just a 10mm near the bottom of the door.
Here is a comparison of the old and new:
(i'm using a different exterior door handle)
**Front removal***
Plastic removed
http://s4.photobucket.com/albums/y107/v ... ndos18.jpg
Lower the window so you can get to these bolts (you can see the bolt to the right, that will need to come off too):
http://s4.photobucket.com/albums/y107/v ... ndos19.jpg
Now either raise the window and have it fit snug in the window seal, or remove it. I usually remove it, nothing fun about this window falling on you, each their own.
Remove this part of the regulator (like a counter arm?) there are two bolts, the other bolt is to the left in the picture:
Unbolt the 3 regulator bolts:
*****Sorry no pics of removing the front regulator assembly, its identical to removing the back, just a little bit more difficult I think. *****
Pic of rear for reference (in case you are to lazy to scroll up)
Removal of front door lock actuators:
Unscrew the front inside door handle (like rear).
Unscrew lock actuator (the 3 on the door sill)
Remove outside door handle
I recommend removing the rear (still front doors) window guide. The picture I took unfortunately is a bit dark, after you remove this you are able to get the actuator out a lot easier:
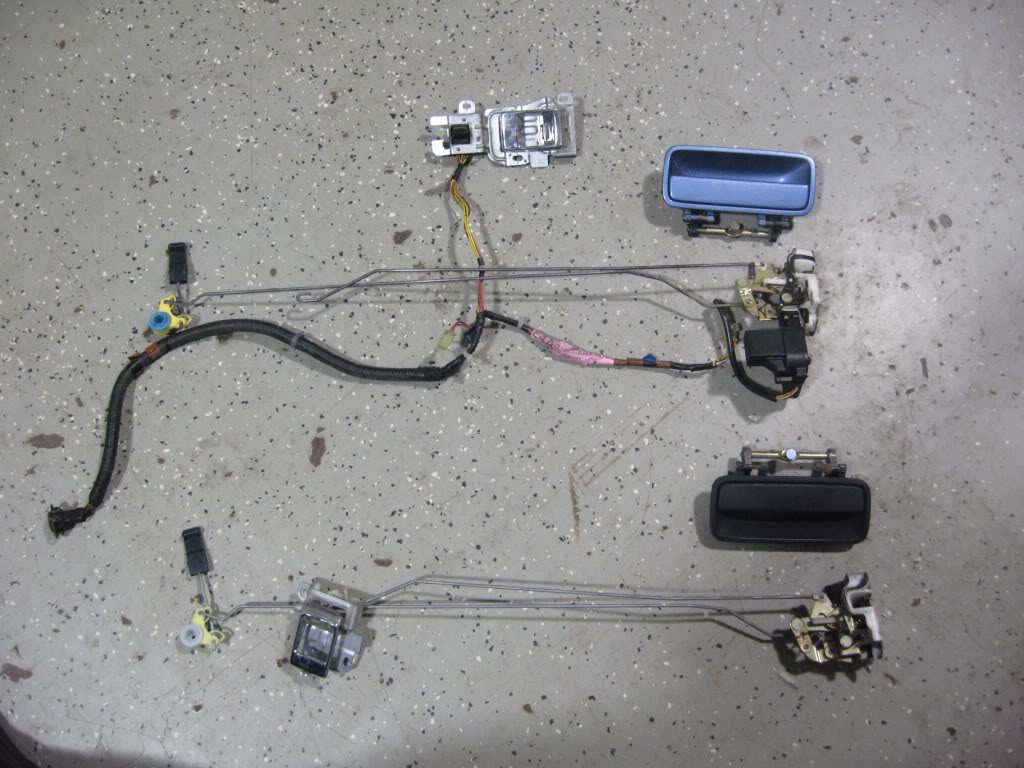
******Comparison photos********
rears:
rears:
front actuators:
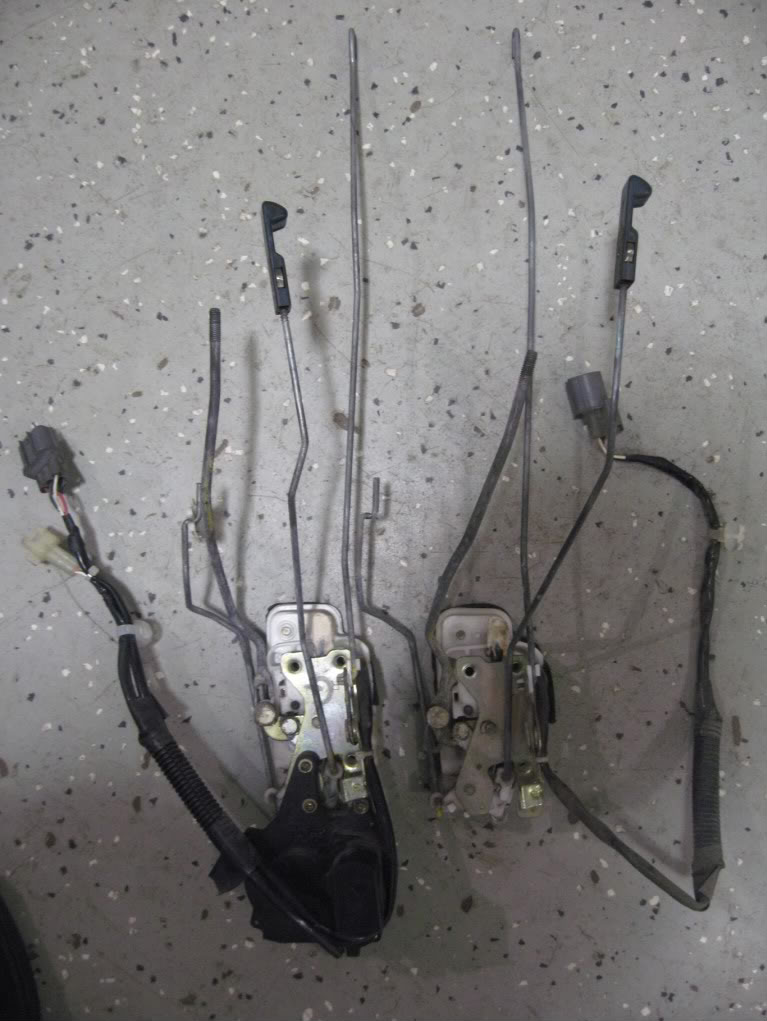
front (bad photo):
******************************
******************************
Ok now all the parts are removed, now I'll explain what needs to be done to some of the parts and how to do them
******************************
The front door handles (this is only if you replaced the front door handles like I did, if you are keeping the stock ones skip this step):
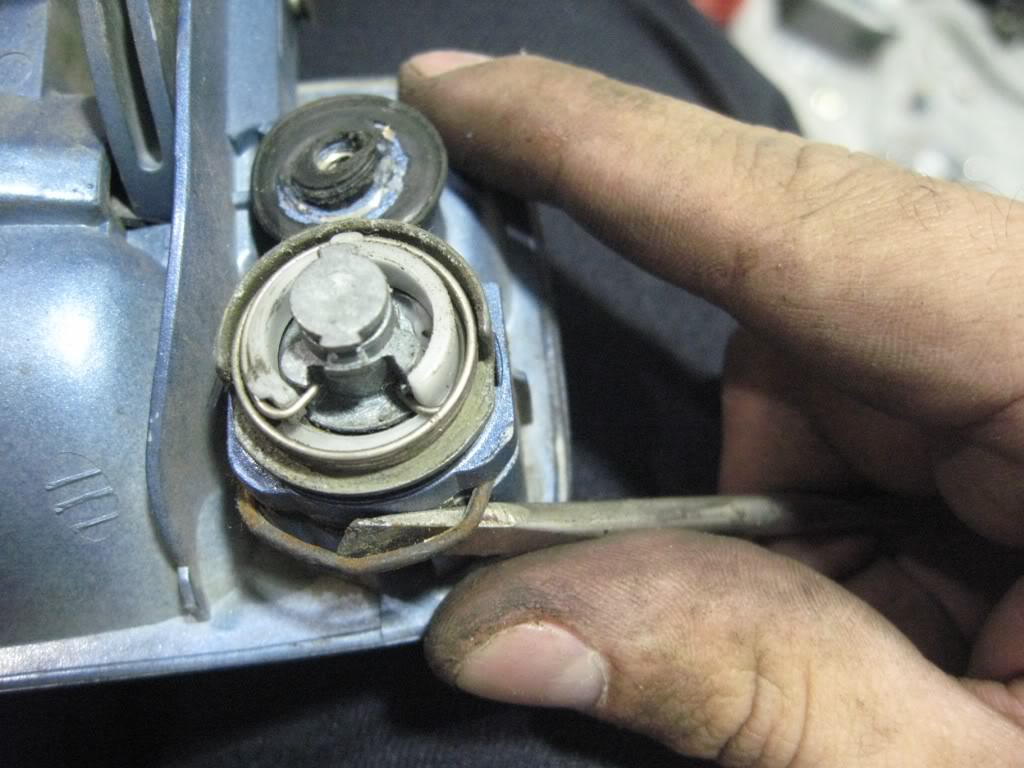
In order to retain your OEM locks, or to replace the front locks you just need to remove this clip, it'll slip out, do this to the replacement part and the original key cylinder and put your other key cylinder in the new door handle:
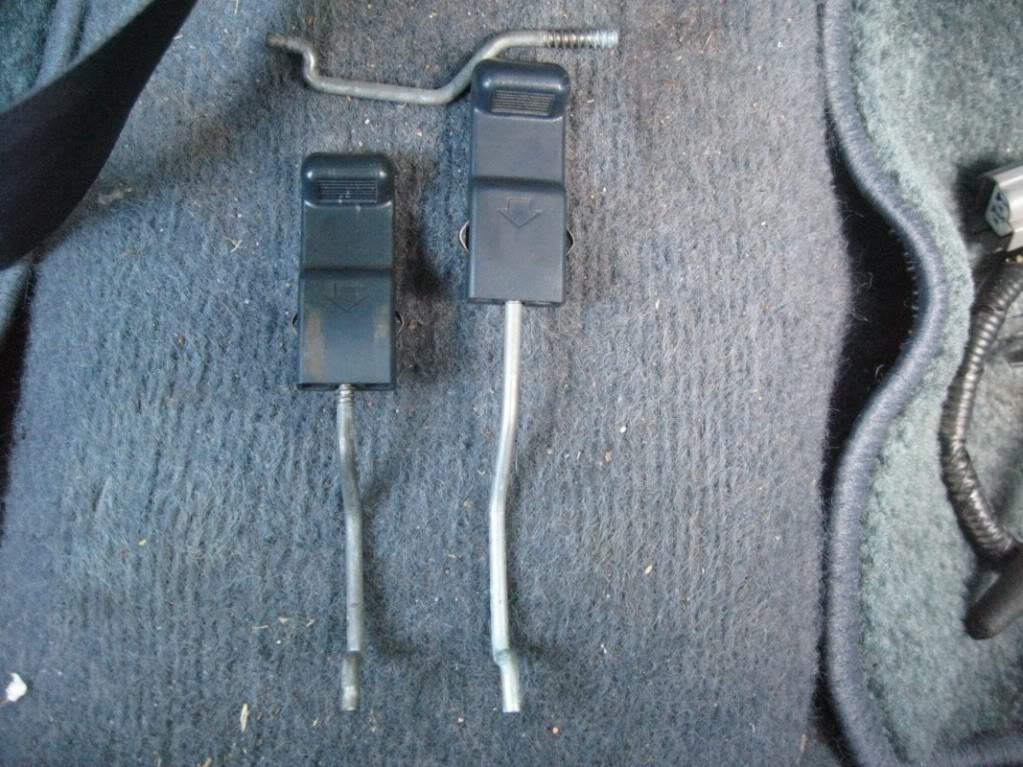
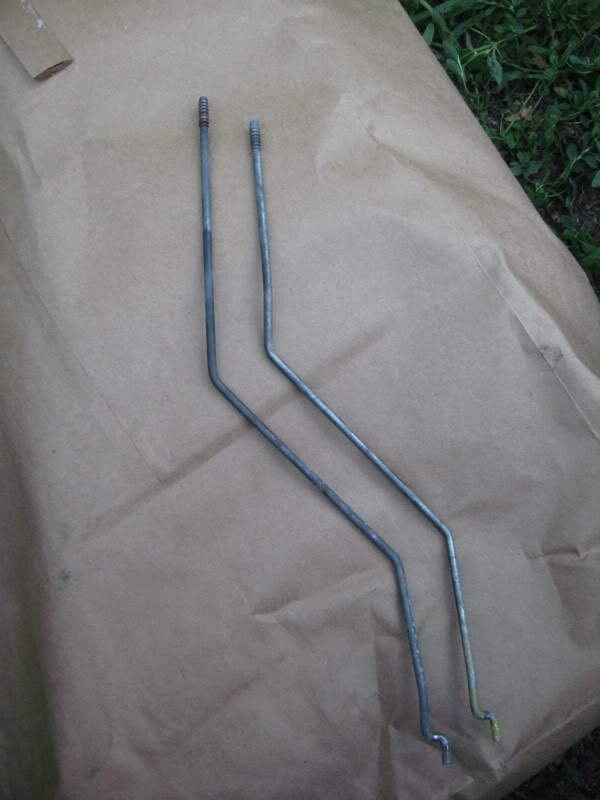
**The rears need no modification other then switching the interior knob rod, actuator and regulator assembly is drop in***
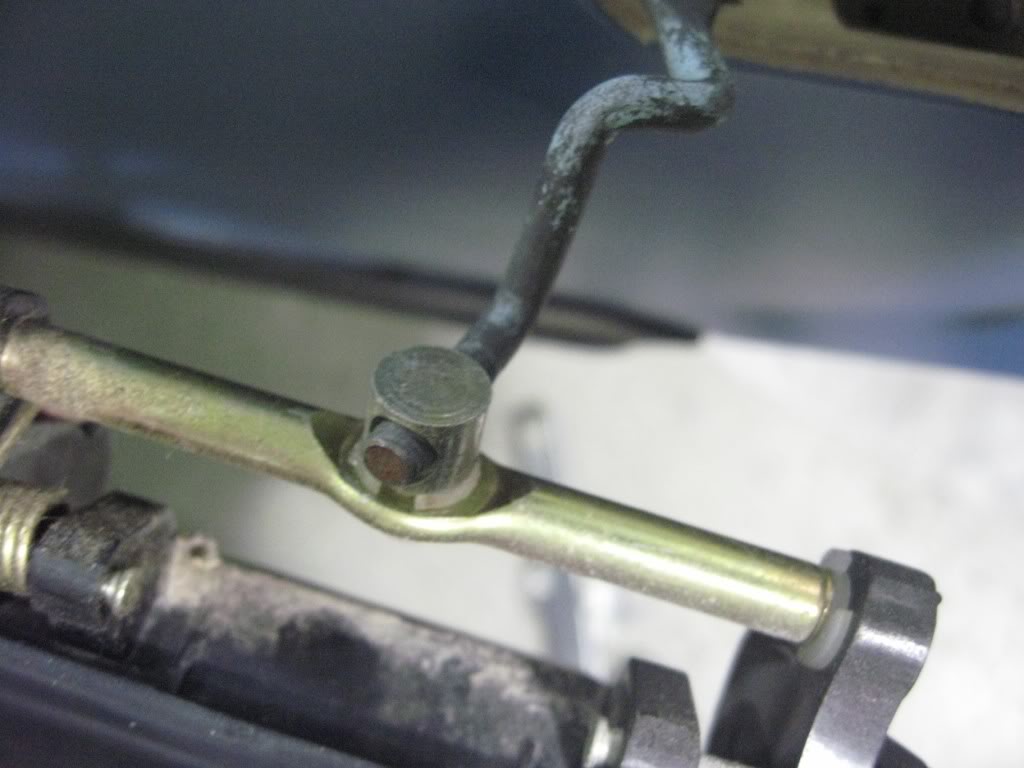
For the front and back you will need to remove these rods and use the wagon ones. Be sure to switch these out before you put the actuators in the front. Sedans are an inch shorter and its difficult to unlock if you try to use them.
The front and rears need teh
I'll refer OG for original track and PW for the power window track:
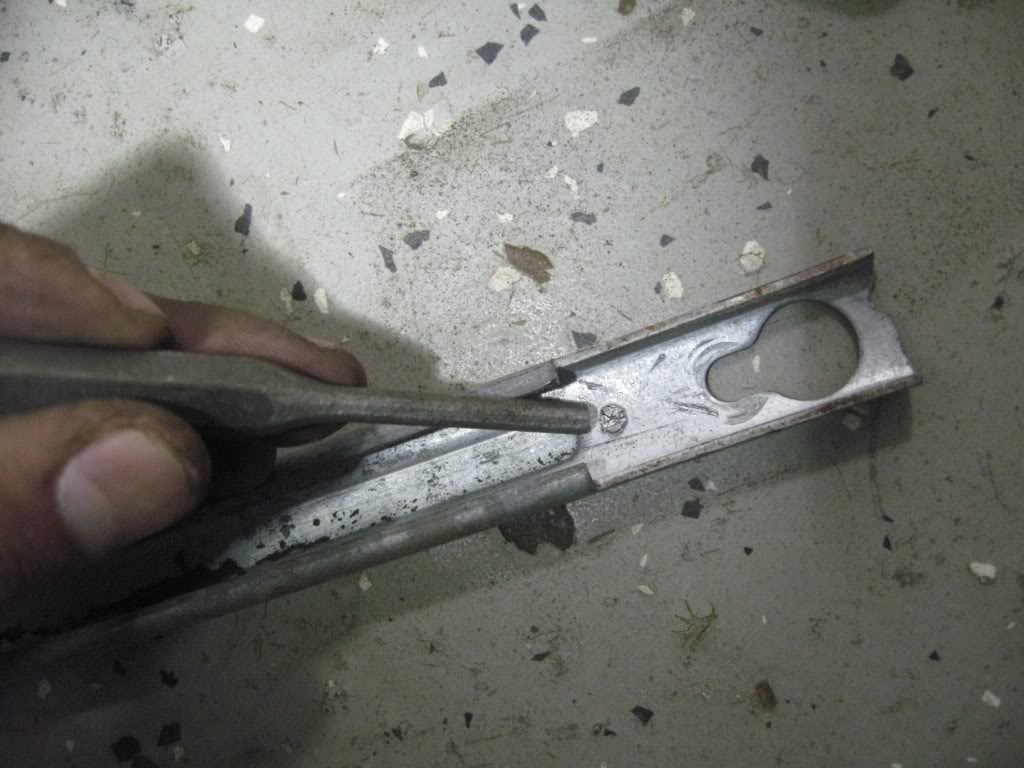
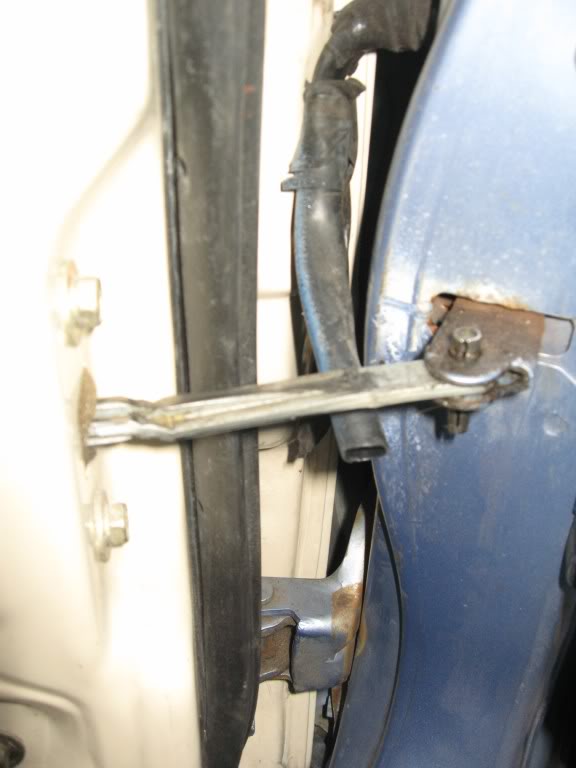
The fronts you can see there is a difference with the longer track, i'm pointing it out in this picture:
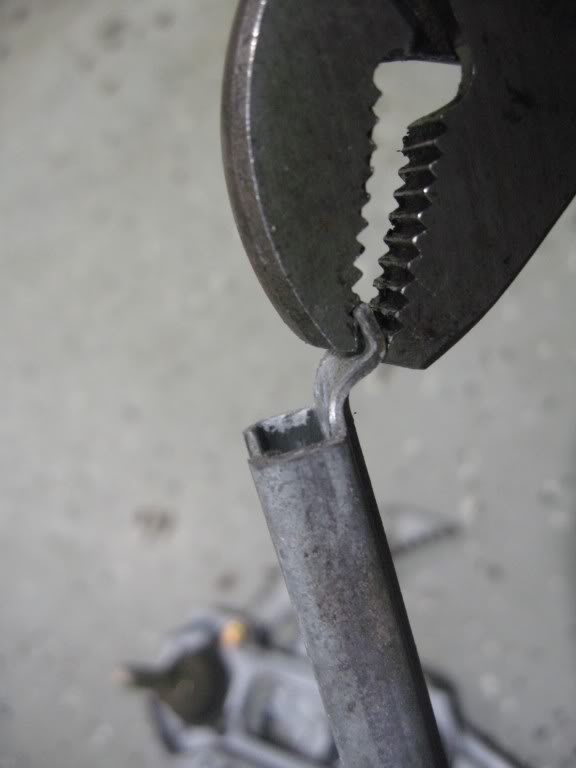
On the OG you can pound out this dent like so (don't do this on the PW since its a little difficult to repound it back out)
Instead of pounding out the dent on the PW, there are tabs on the side of the track, just bend the lip so you can bring the roller over the ball instead (sorry no pics)
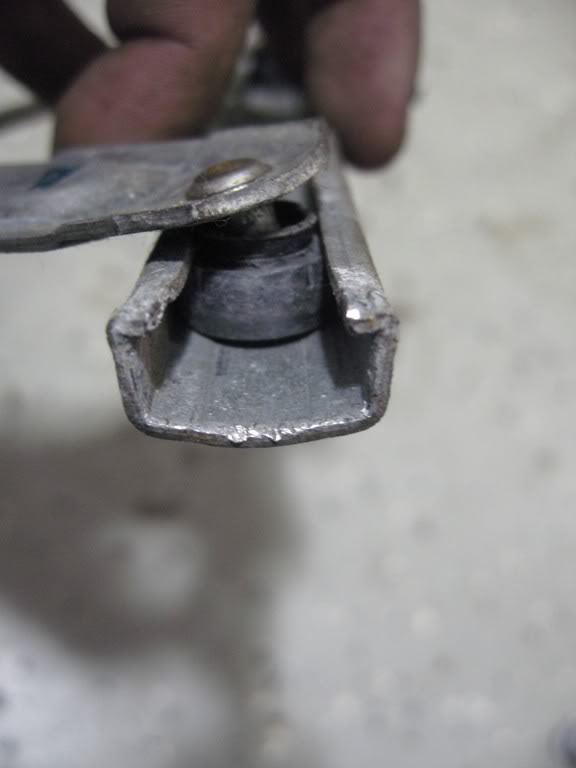
On the other end you can remove it like so:
Roller should roll out:
Switch the tracks and simply rebend the parts back to normal.
Door panels:
rears/front right, you will need to cut it about a good 2 inches I think (off the top of my head), how I did it was I would test fit the actual door handle cover and just keep cutting until I thought it was enough. Sorry no exact dimensions. There is a tab at the end of the cover that can be broken if need and it will sit in fine, I chose NOT to do that, I kept the tab, I used a dremel with a circular cut off wheel:
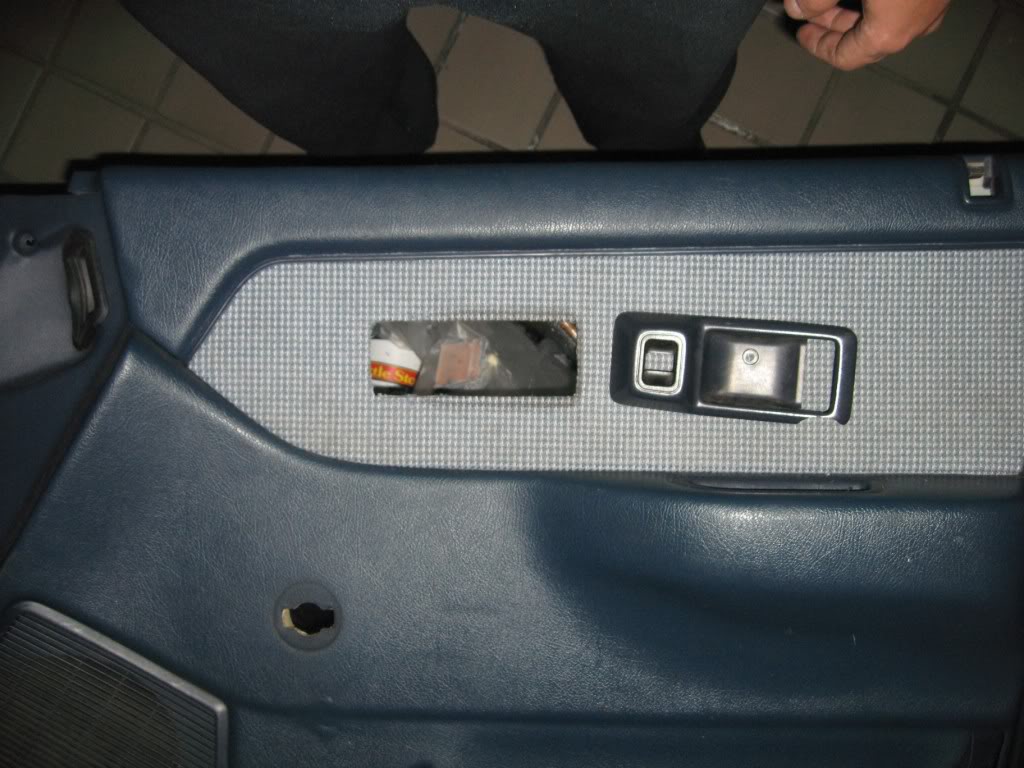
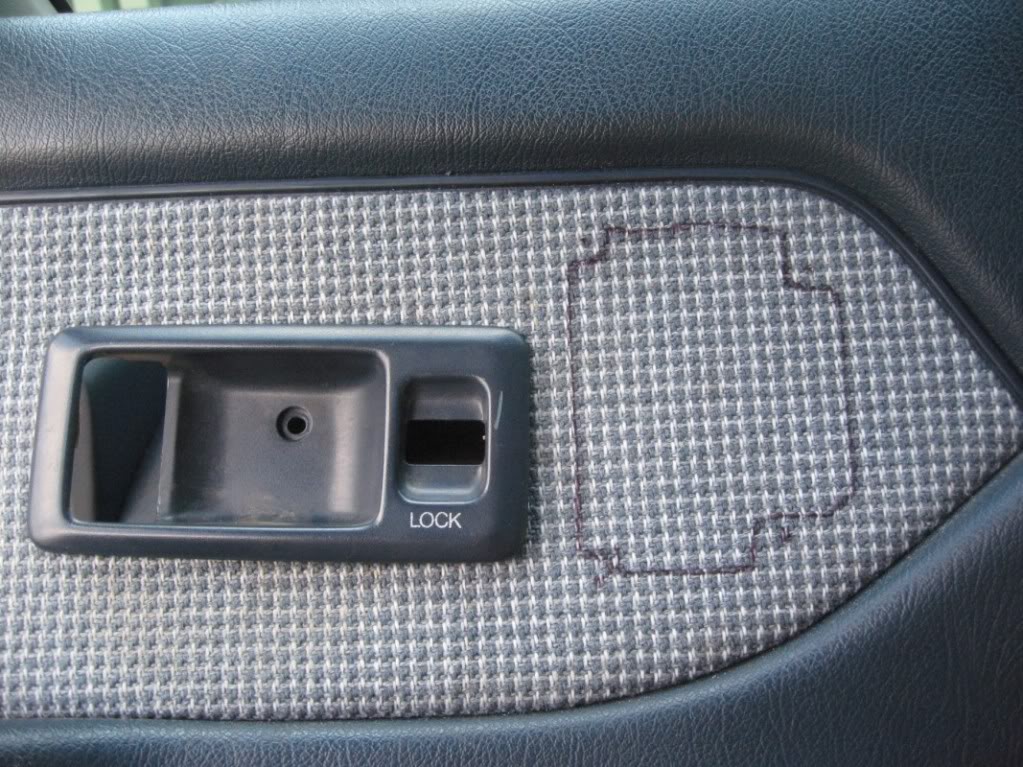
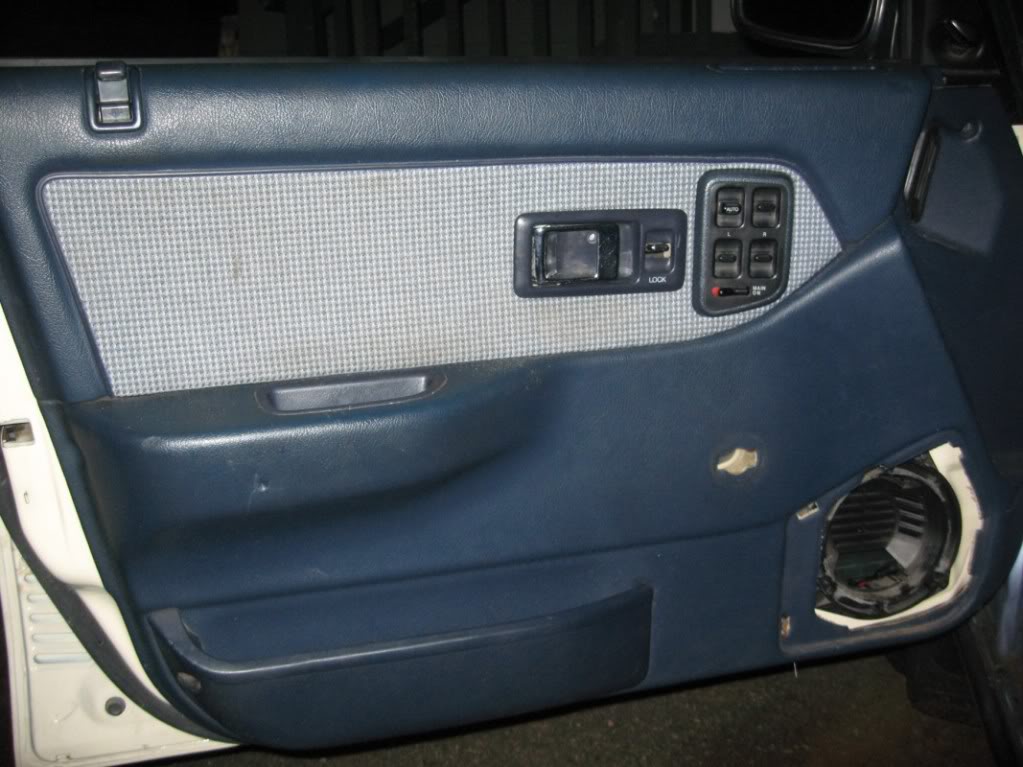
For the driver side, it gets a little more technical. I used the metal bracket to line everything up and I just drew it out. I would recommend going a little higher and to the left a little more (closer to the lock switch) then I did since i ran into some plastic on the rear that held the fabric down. where the screws go through you actually need to cut the plastic out. i thought the screws would go from the metal frame to door panel to switch, but it just goes metal to switch (hopefully you understand what i'm saying), this way the metal applies pressure to the surrounding area and holds the switch nice and snug. I have a decent picture on my phone but can't upload it at the moment. Here is before and after shot:
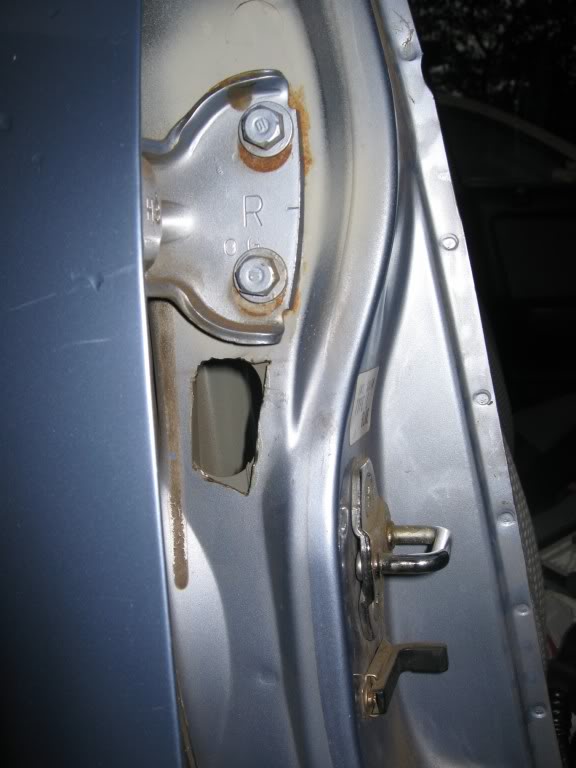
In order to run wires from the rear doors you will need to do some cutting on the rears. I looked at a sedan and figured out where the most OEM spot was to cut. I got lucky because on the opposite side was a hole waiting for me! Your welcome for this picture!
***************
Installation
***************
Reverse the order of dissassembly. Sorry no pics. Do no put on door panels or plastic, because wiring is up next!
***************
Wiring
***************
Ok now that the easy stuff is done, time to get on to this wiring. If you don't have a helms, I STRONGLY recommend it. I will try to scan some pictures for everyone since I have one. A DVOM will make life a lot easier if you go the route I did for wiring (where you use only 3 different colors of wiring black, red, yellow)
The door panel harnesses will just attach as if they were in a sedan. So go ahead and run them. DO NOT cut them otherwise you will make a big headache like I did (I was planning to go a different route but in the end decided to stick to OEM):

This are the harnesses from the outside of the door panel to the interior harness. I just cut them off as close to the interior as possibly. Now I will extend everything to reach the driver side fusebox area:
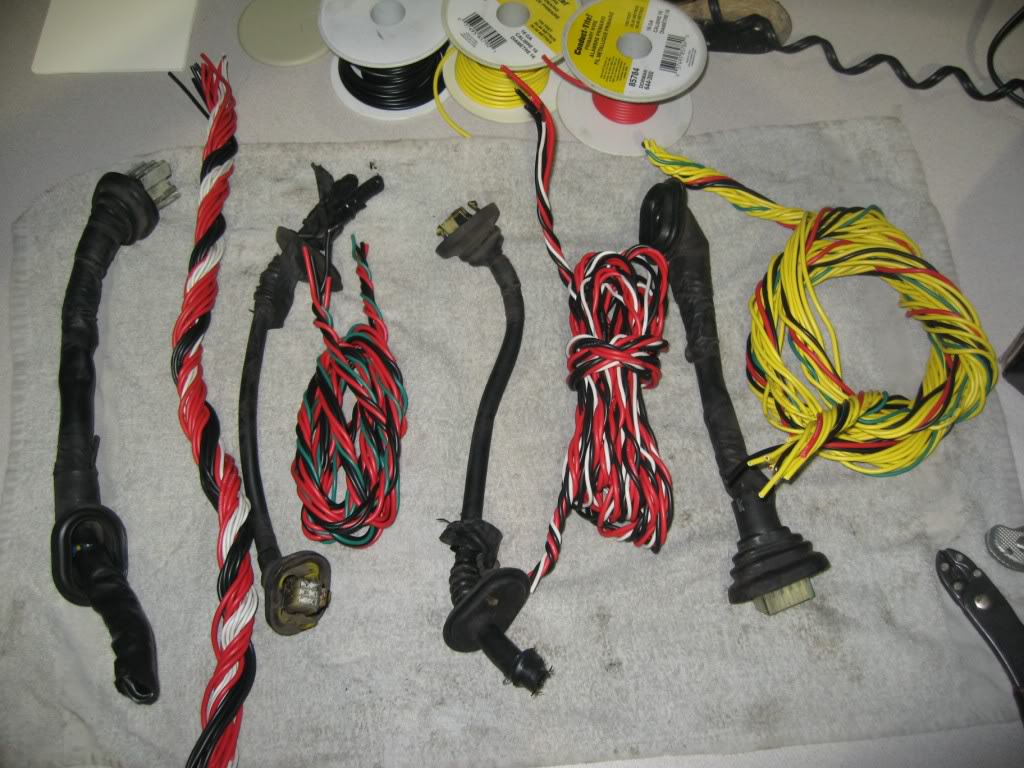
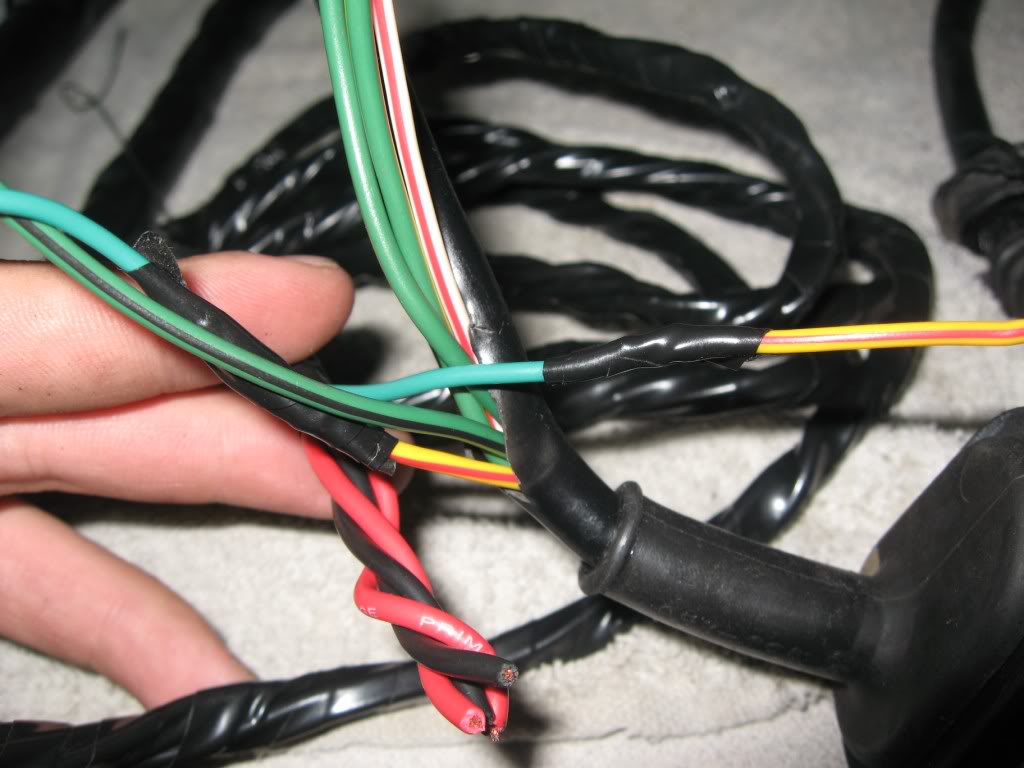
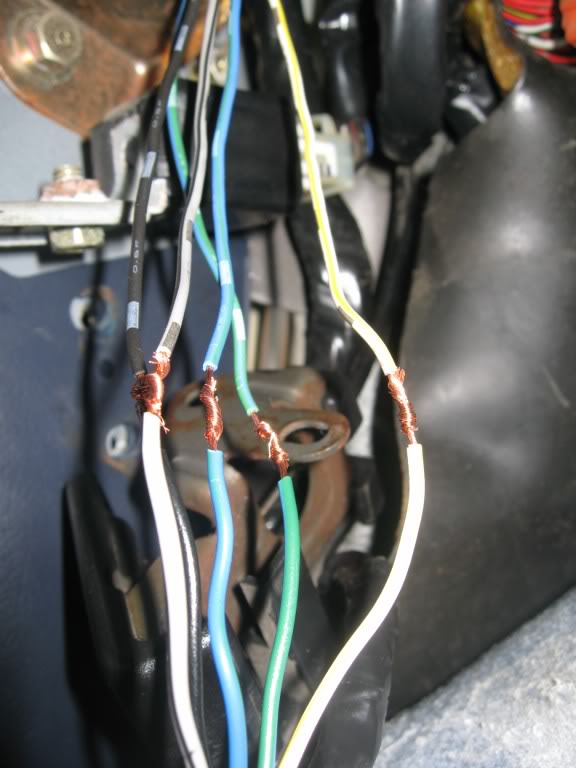
**This is how I did it so I knew what wire was what at the end, since i used only 3 different colored wires**
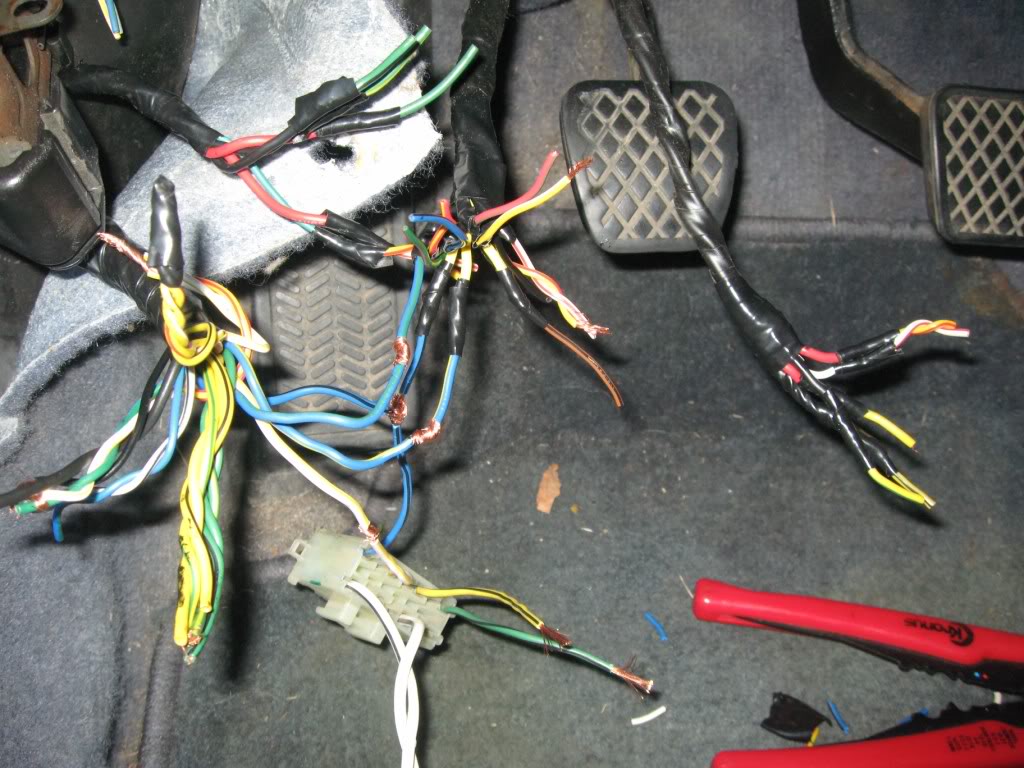
I cut off half of the wiring from the OEM harness/plug and attached it to the end of the yellow wire, red wire, or black wire. and then wrapped up the wiring so only the colors at both ends showed OEM coloring, no yellow or red or black would show (well black but thats for grounds)
In this picture you can see what I mean, I cut the harness in half:
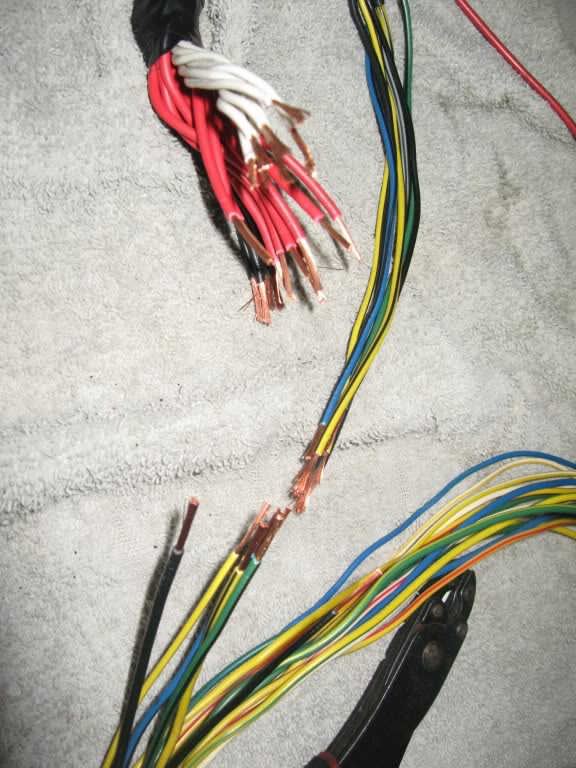
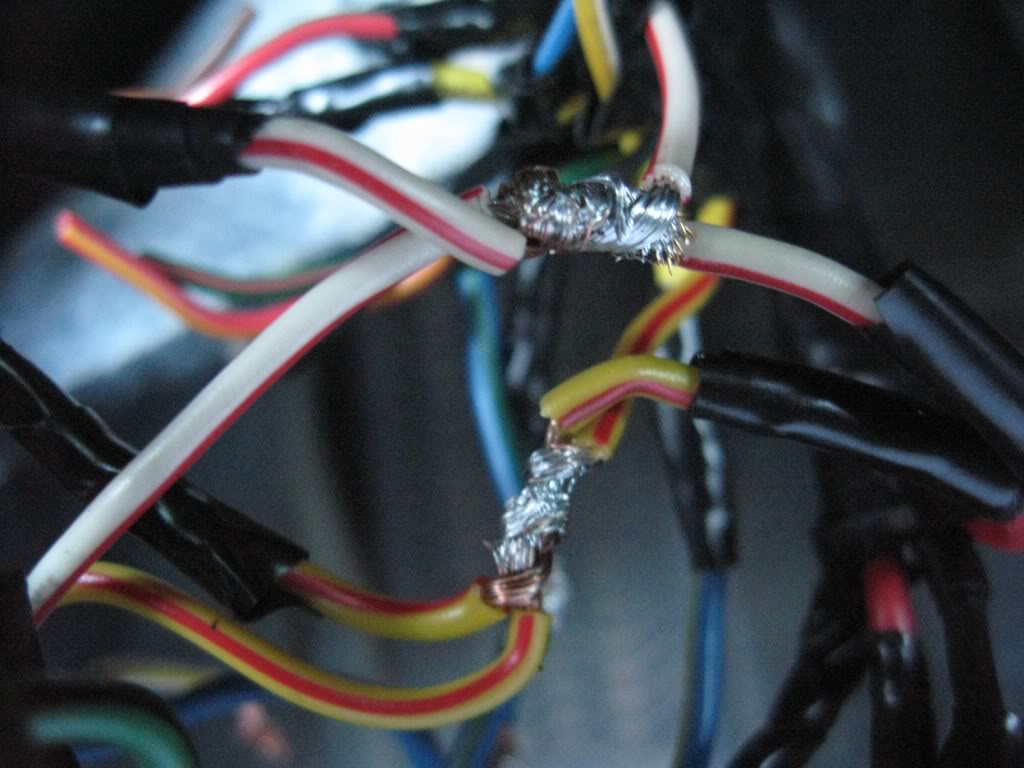
In this picture you can see the yellow/red wire go to a green wire (well I guess I had used 4 colors technically :P) then back to yellow/red. The green wire was completely wrapped in electrical tape afterwards so it wouldn't cause any problems.
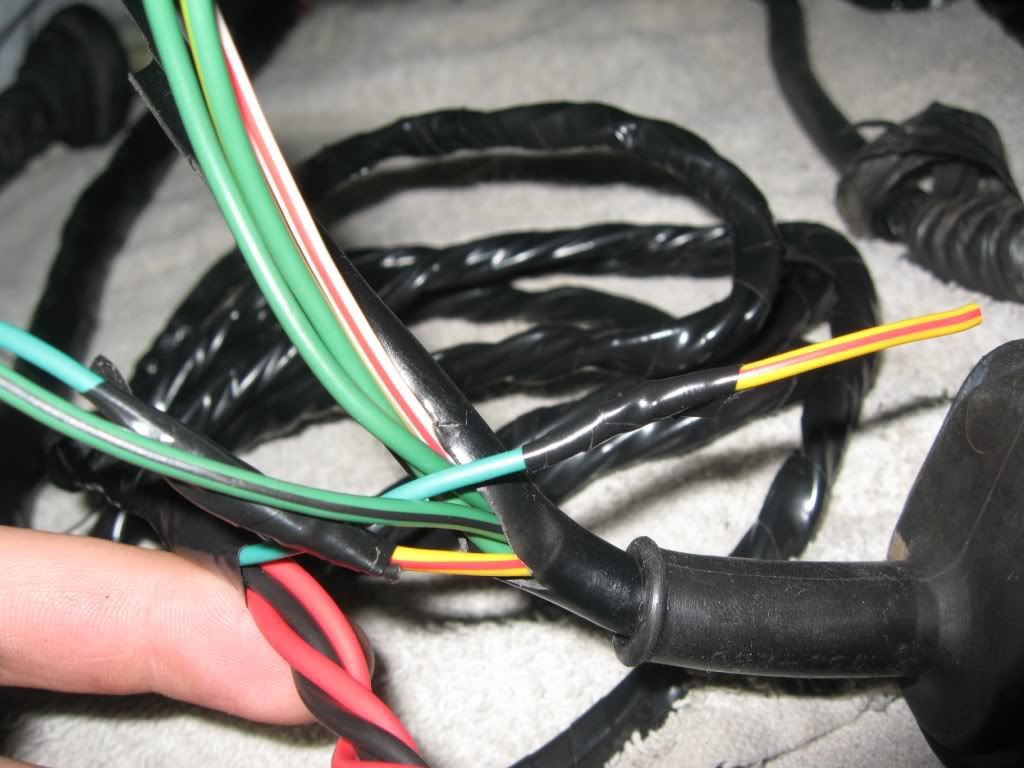
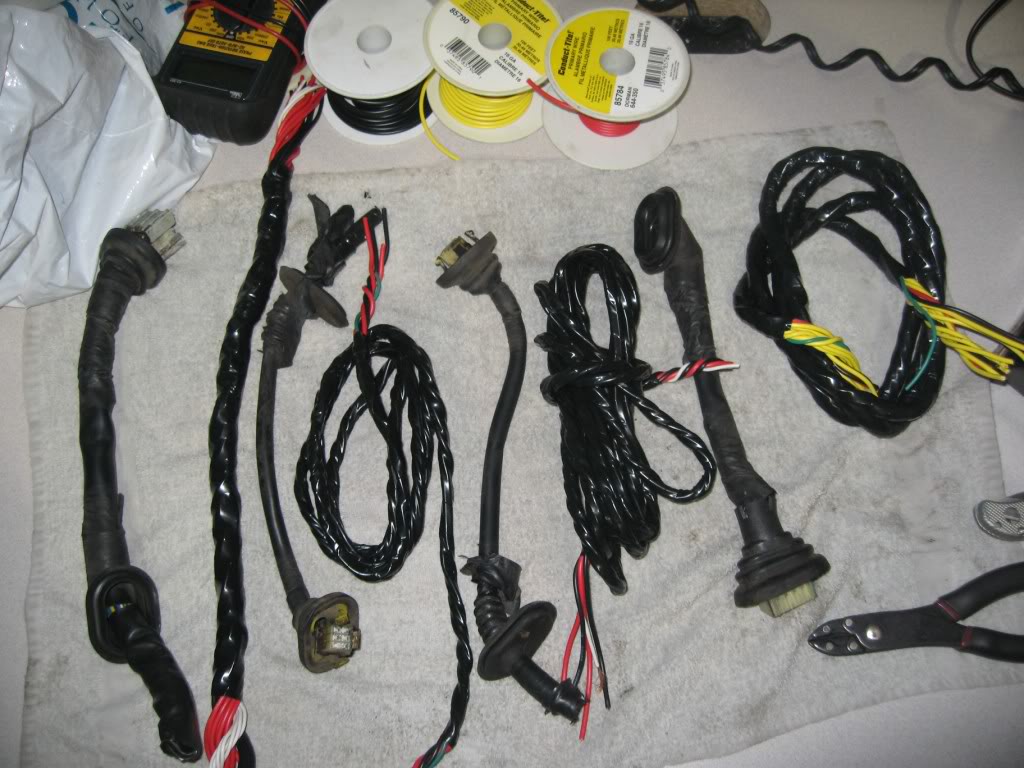
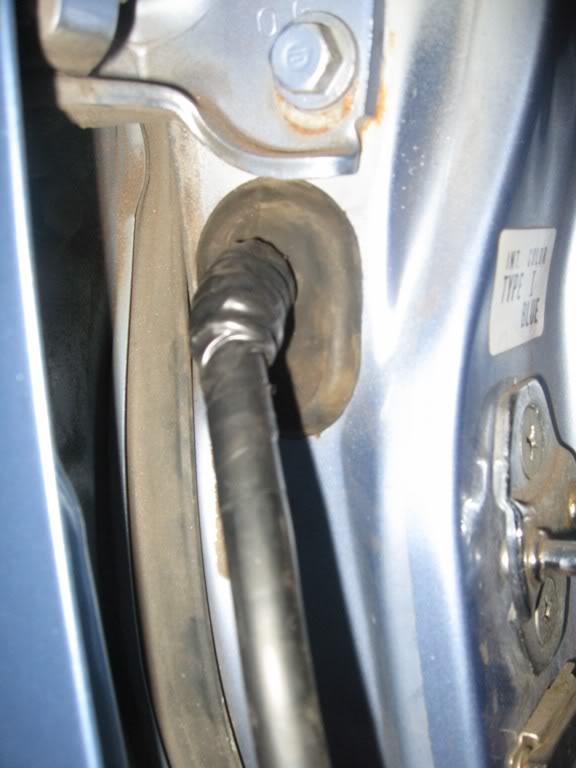
This is a final product, with door grommets installed at correct length (only picture i have like this of them):
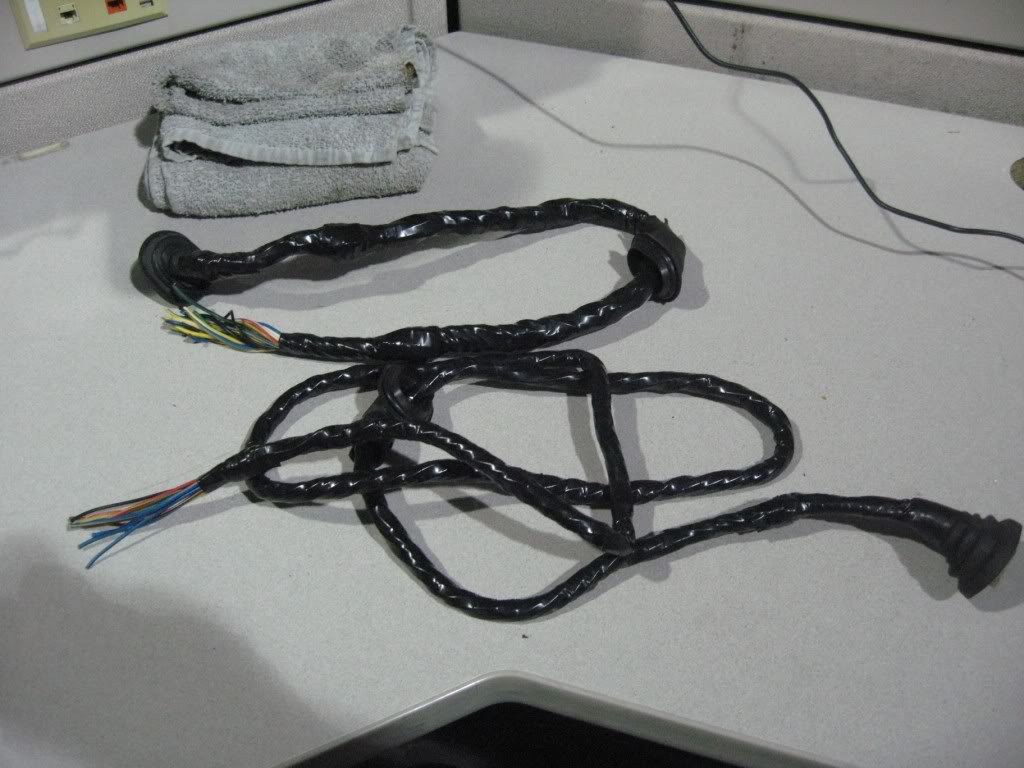
The wiring should be ready to install and run through the cabin of the car to the fuse box. I had chose to run nearest the regular wiring as much as possibly rather then run it wherever I wanted. Looks better IMO:
Rear door hole that was cut:
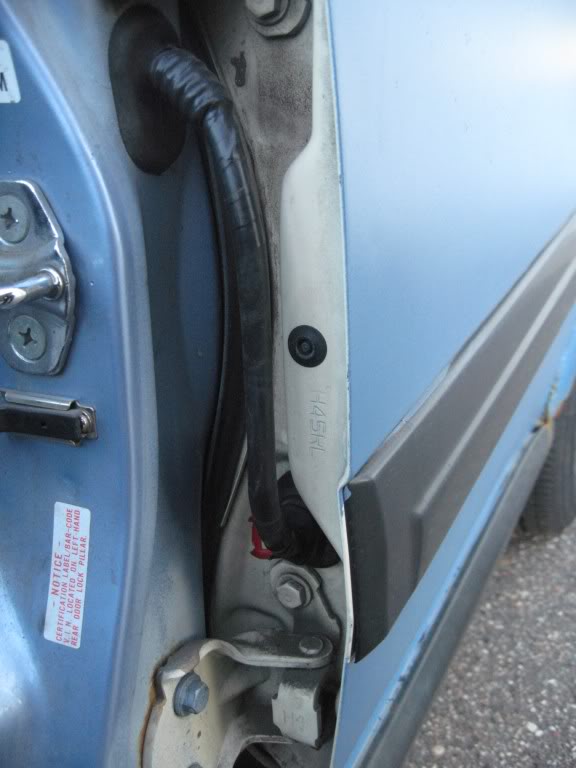
Run on the inside of the car:
Go below this plastic piece and below the carpet to the front near the dash:
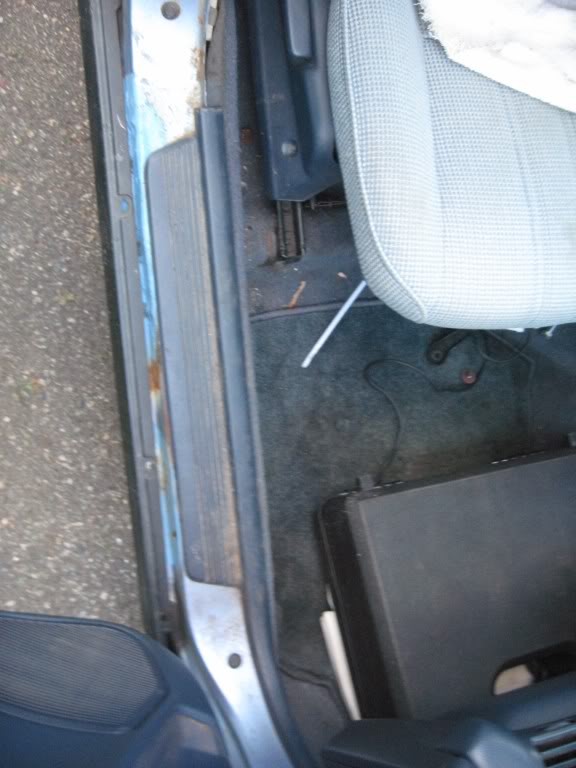
Run it below the carpet until you get near the fusebox (thats the route I took)
***
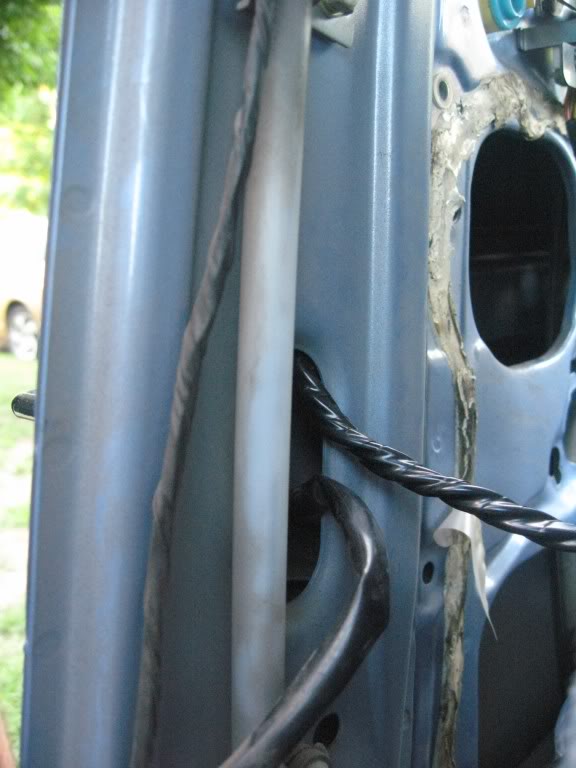
For the fronts due to space its a little more complicated:
I cut the original harness in and used it to pull my wires through to the inside of the cabin:
I tied the original wiring to the new wiring and pulled it through from the inside of the cabin, otherwise if you have a flexible/sturdy hanger you could do it that route, get creative because this is an annoying part:
********* I recommend doing the route I went because you will reuse the original wiring!!! *********
**********************************************************************************
Now just start connecting wires and you are done.
j/k
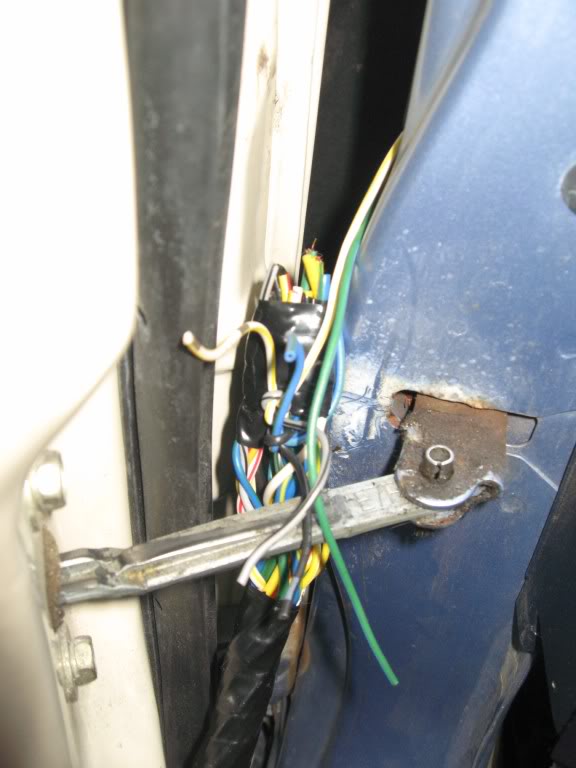
Here is where I had the wires run to (I was in the middle of connecting wires):
*There really is no specific order to go in (besides the power wires which I recommend not hooking up until you have everything else hooked up and fuses in places*
Power locks is the easiest you have white/red and yellow/red and a white/yellow. White/yellow is your 12vdc power source. White/red (lock+) and yellow/red (unlock+)are switches.
The white/red and yellow/red from the driver side door lock switch is just attached to the other 3 doors. Nothing special just connect them all together. *(the white/yellow we will come back to)
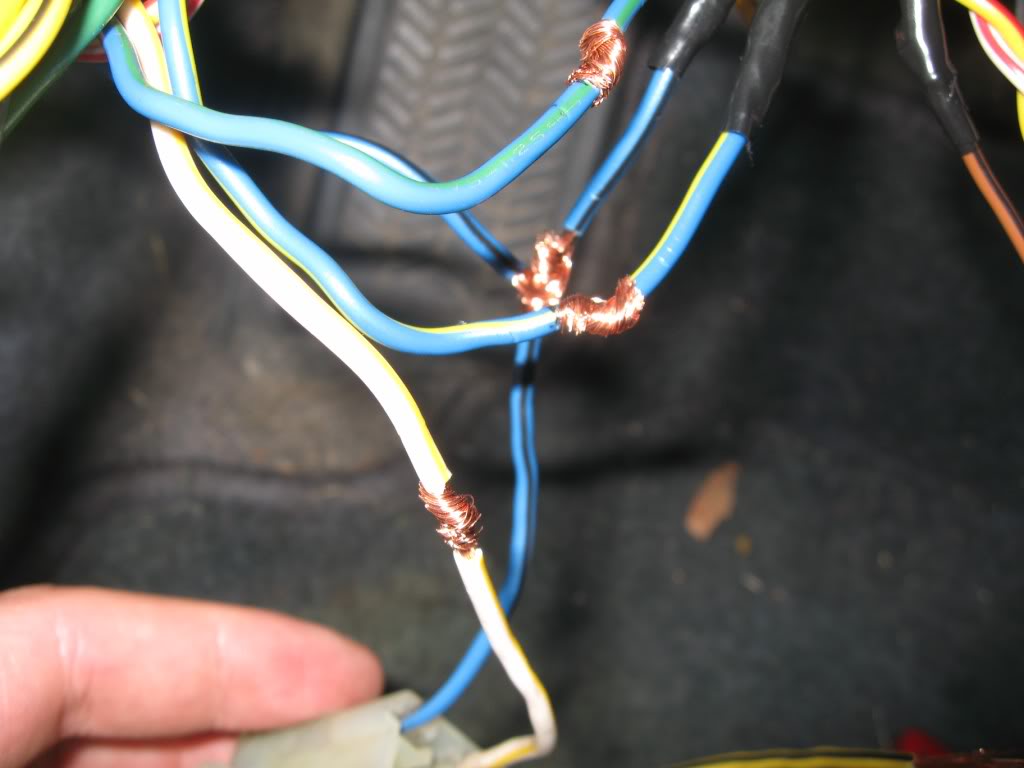
For the front right you will connect blue/black (there are 2 blu/blk coming from passenger side so make sure you have the right one),
The blue/black wire will connect with the blue/black from the driver side switch AND it will connect to the blue/black wire from the Power Window Fuse holder
The blue/green will connect to blue/green from driver side switch.
The blue/yellow will connect to the blue/yellow from driver side switch
*don't mind the yellow wire here that is for the right rear window
No pictures of the rest of the power windows but it is identical to the picture above. I will explain what goes to what.
Left (driver side) front:
White/Yellow goes from fuse holder to Driver side white/yellow switch
Left (driver side) Rear window:
Green/black goes to Grn/Blk to Grn/Blk Fuse holder
Green/yellow to Grn/Yel
Green to Green
Right (passenger) rear window:
Yellow/Black to Yel/Blk to Yel/blk fuse holder
Yellow/Green to Yel/Grn
Yellow to Yel
Now if you did as I stated life will be a lot easier for yourself:
Just connect the same color wires to the ones that were originally going to the door, remember the wires you cut and helped pull your wires through the outside to the inside of the car? Yeah those ones. All you do is match colors for the speakers, and if you have auto seatbelts you will reattach those wires:
***
Ok now you should have all necessary wires attached and you just need to run power and ground and power window relay.
I forgot to get a power window relay from the junkyard so i bypassed it for now, I can try to explain it if anybody needs help doing it (it just prevents you from being able to roll the windows down when the car is not turned on)
Hooking up the power source:
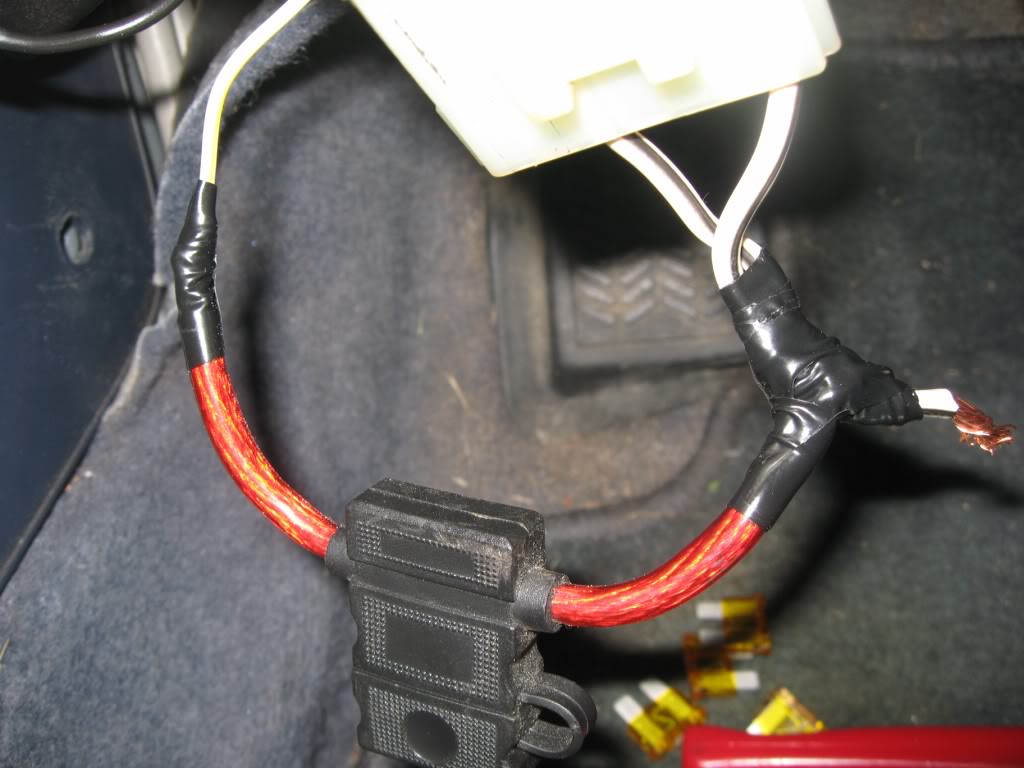
Remember that white/yellow from the power lock? Ok well technically its suppose to go to fuse 3, but I dont' have time to mess around with that right now. I would LIKE to do it in the future but I'm not a huge hurry for it. So I used a fuse holder and this is how I did it.
I attached it to the white/black wires from the fuse holder and I attached both white/black wires together. So in a sense its all 3 wires connected together (no issues so far).
This is the pic of the white/yellow wire connected:
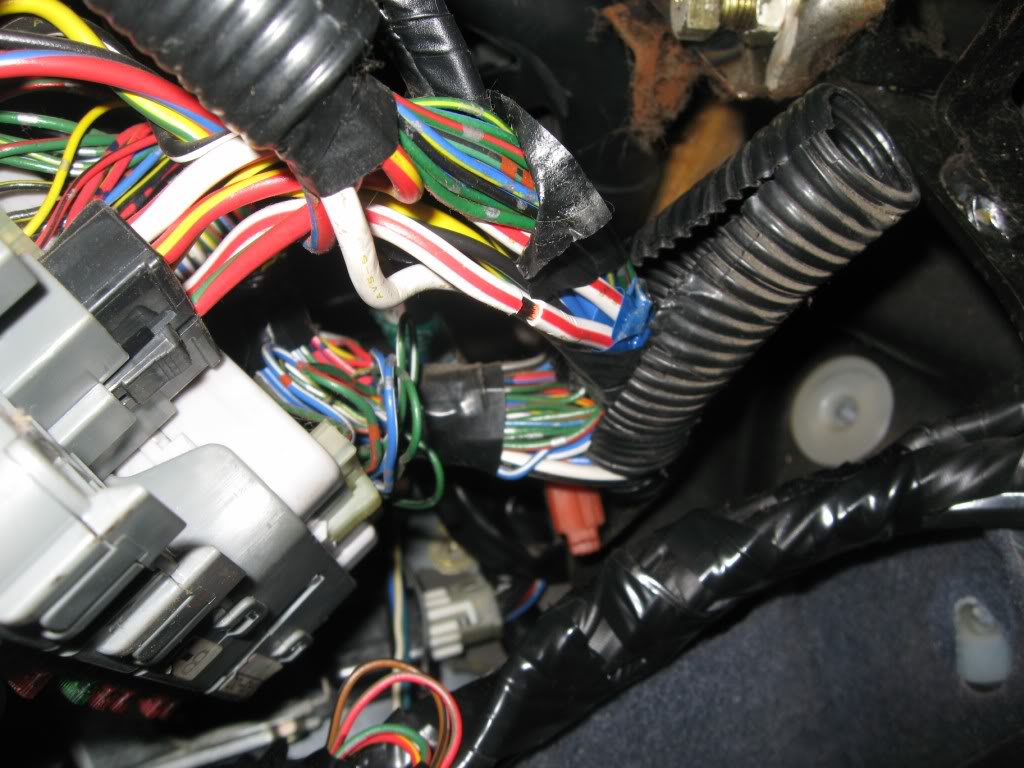
Here is how I attached the white/black wire to the white/red power wire. Its behind the fuse box, I just split the shielding and tapped into it. *helms states white/red to white/black
For the ground wire, I just put a round fitting on and attached it to a ground (sorry no pics). Make sure the metal is bare metal and not covered in paint or you run the risk of improper ground.
Now clean up all the wires with some tape or plastic covering and tuck them away. Attach the fuse holder to the side of the fuse box:
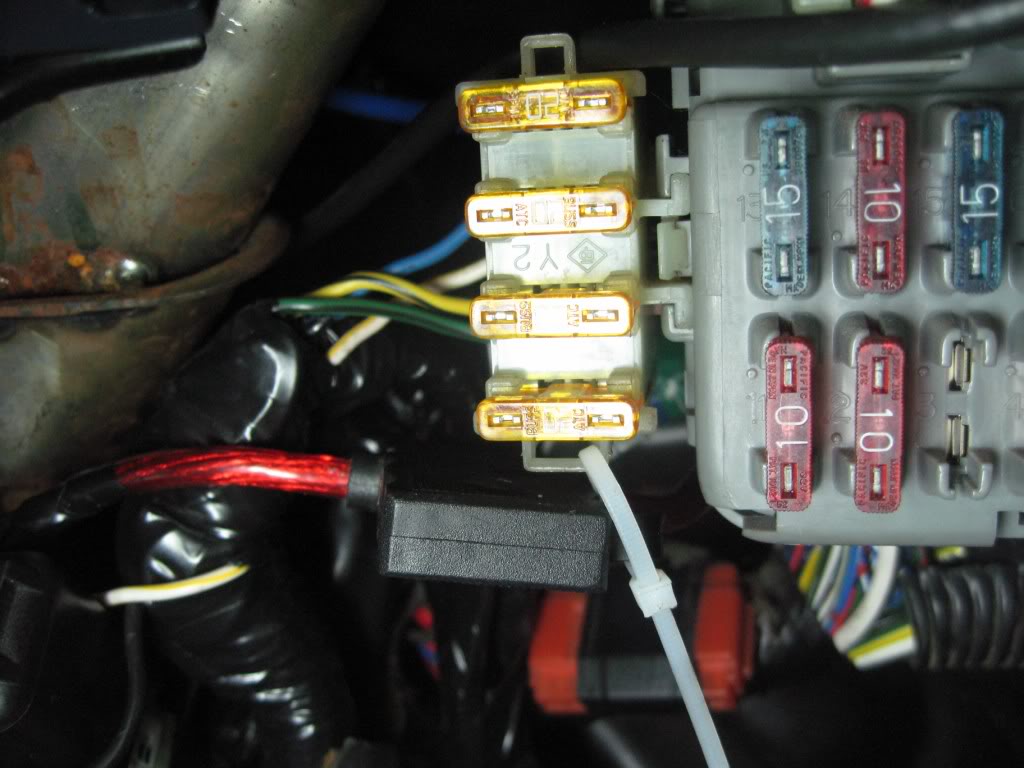
Throw some 20a fuses in there and test them out. If everything is working perfect then you can reattach the door panels. here is what I did.
I just use some spray 3m adhesive stuff (cheap stuff works fine), fine some durable plastic and cut it out to the previous liner shape. *i covered the speaker on accident its been recut since
Throw door panels back on and enjoy.
Just some notes from my experience. cut one wire and test run it exactly how you want it to go, i had cut mine too short and ended up having to add additional wiring in (not fun in that cramped place)
Make sure all of the switches are connected when you test, I had left one unconnected and the window didn't work, but i quickly realized.
When you get to the last of the wires and you have to connect them all really take your time and make sure you are connecting the right wires, blowing fuses and troubleshooting is not fun. DVOM will help you A LOT in your automotive life purchase a decent one.
Also anything I thought was going to get wet or was a power wire I would solder and heat shrink, or any wires I thought would be moved around.
I soldered ALL wires, the interior ones I just taped up and retaped and then taped again
Will have helms pictures up soon.
List of parts:
88-91 Civic Ex/Lx parts car
All 4 window regulators
All 4 interior door handles with window switches
All 4 lock actuators with all of the connecting rods
All 4 door harnesses and harnesses that go to the inside of the car
Door lock relay (located on inside of driver door)
Driver side window switch/relay
Power Window relay located near the fuse box *optional
Power Window Fuse holder *optional (nice to have)
Lots of spare wire (unless you take apart the parts cars wiring harness)
Heat Shrink
Lots of Electrical Tape
Soldering Iron
Solder
DVOM (digital volt ohm meter)
Spare fuse holder
Helms manual
LOTS OF PATIENCE.
Would I do this again, no. I have spent around a month working on this off and on (more off then on though). But it is nice to have.
Removal:
Hopefully you know how to remove the door panel. If not, 1 screw behind the interior door latch handle, 1 screw on the side of the door panel, 1 screw in the door armrest handle, **front doors have additional screw below the pouch thing). Pull the clip off of the window crank and then pull of the window crank. Take off interior door handles, and then basically pull the door panel towards you, there are clips behind the door panel that will snap off.
Next just cut off or pull the plastic off, unless you plan to reuse then try to be careful and pull it slowly (maybe use a heat source). I replaced it so I just tore it off (and recommend it :P).
Time for pics. Now time to remove the manual windows, we'll start with the easy back ones first, put the crank handle on so you can move the window up and down (you don't need to put the clip on).
Move the window towards the bottom so you can get to these bolts that hold the window on:
Remove both, I just lifted the window up and made sure it stayed snug against the window gasket, otherwise you can take the window out too.
Unbolt the following bolts:
All 3 of the ones holding the regulator on:
Now you should be able to pull out the regulator assembly:
Here is the opposite rear door without the window regulator in there:
Now is the time to remove the door locks, so we will start the with rears again:
Remove the 2 screws holding the interior door handle on:
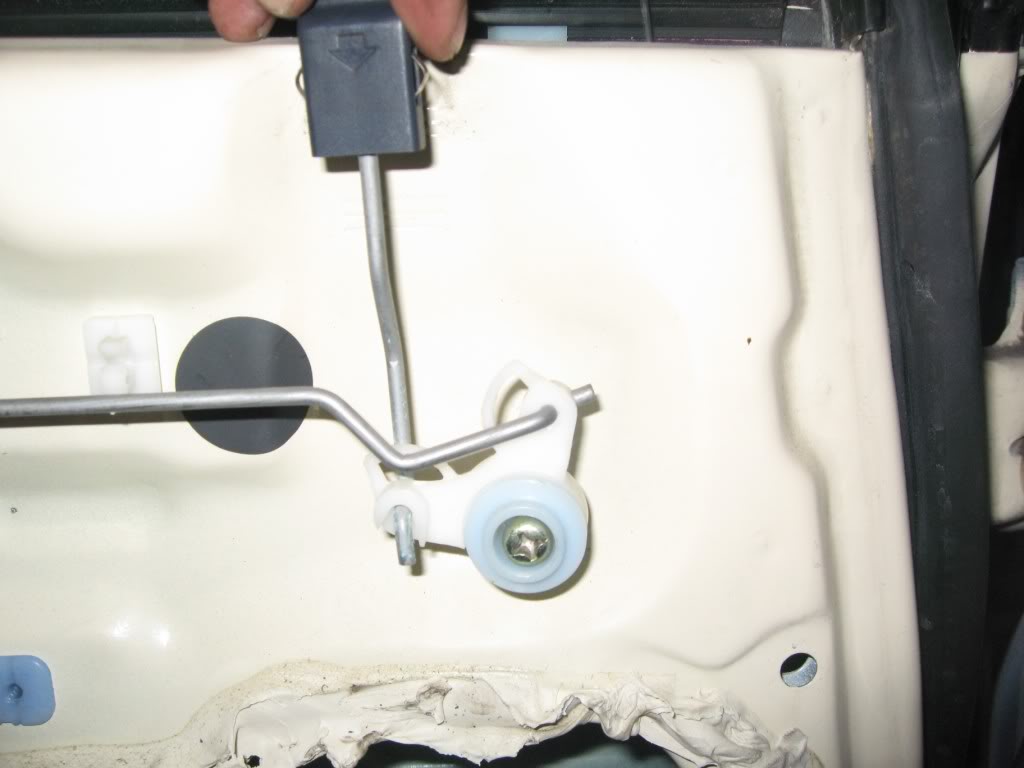
Unscrew these 3 screws:
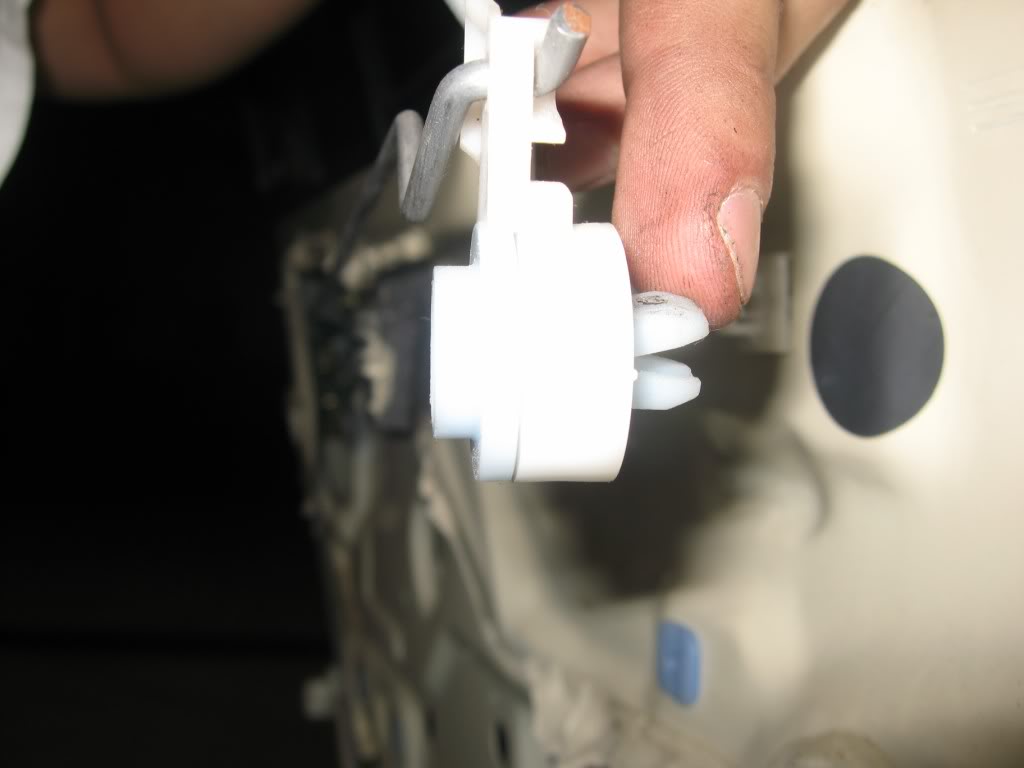
Unscrew that big screw in the blue thing:
Using a pliers reach on the inside of the door and pinch this so it will come out, otherwise you may have luck just prying it out (i didn't want to risk breaking it):
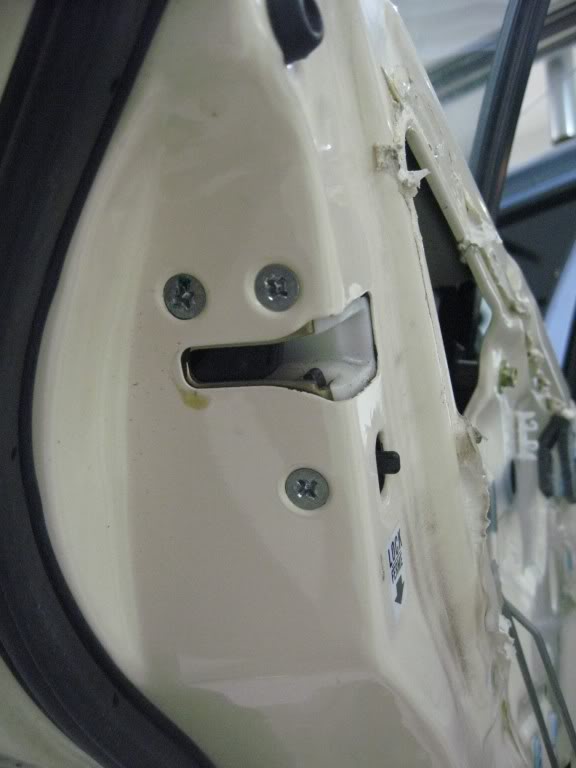
To remove the outside door handle:
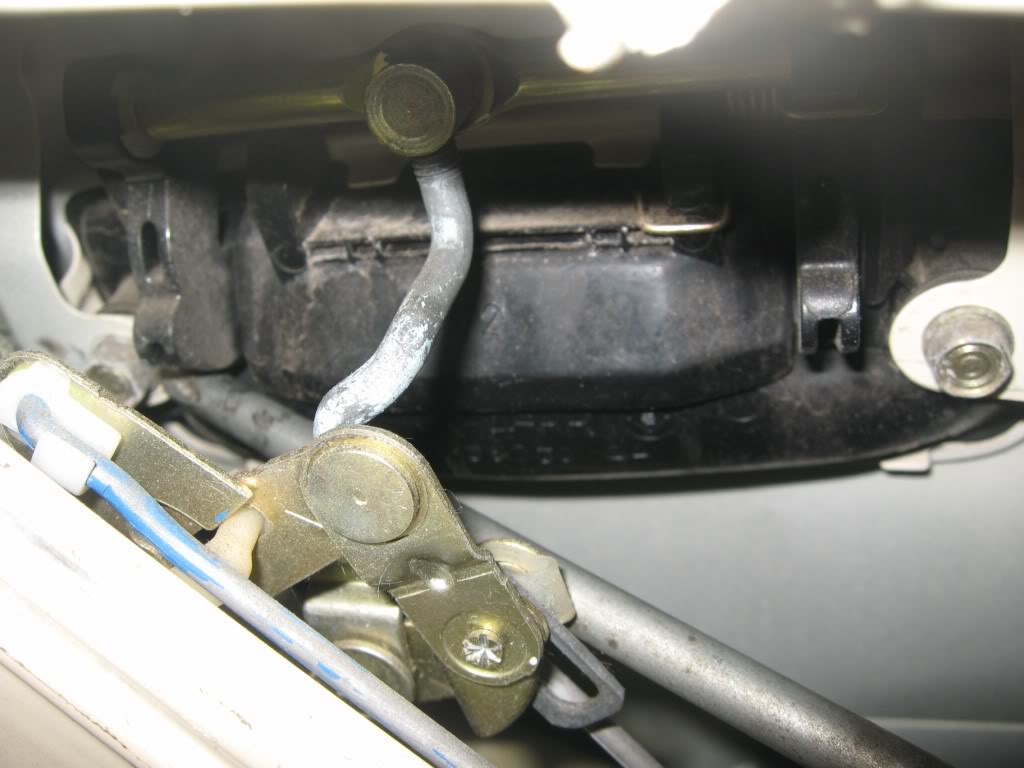
You'll need to take off the two bolts from the inside. I am pointing to one bolt with my screw driver, and the other one is visible to the right:
Here is how I do it, I move the actuator out of the way and get the difficult one this way, then just unbolt the other one that is easy to get to:
From the exterior you will want to pull the handle out and then you should be able to twist this off. Just keep twisting until the exterior door handle is off:
You can remove the actuator now, just have to snake it around and it should come out. You MAY need to remove the window guide but I can't remembe off the top of my head, if you do its just a 10mm near the bottom of the door.
Here is a comparison of the old and new:
(i'm using a different exterior door handle)
**Front removal***
Plastic removed
http://s4.photobucket.com/albums/y107/v ... ndos18.jpg
Lower the window so you can get to these bolts (you can see the bolt to the right, that will need to come off too):
http://s4.photobucket.com/albums/y107/v ... ndos19.jpg
Now either raise the window and have it fit snug in the window seal, or remove it. I usually remove it, nothing fun about this window falling on you, each their own.
Remove this part of the regulator (like a counter arm?) there are two bolts, the other bolt is to the left in the picture:
Unbolt the 3 regulator bolts:
*****Sorry no pics of removing the front regulator assembly, its identical to removing the back, just a little bit more difficult I think. *****
Pic of rear for reference (in case you are to lazy to scroll up)
Removal of front door lock actuators:
Unscrew the front inside door handle (like rear).
Unscrew lock actuator (the 3 on the door sill)
Remove outside door handle
I recommend removing the rear (still front doors) window guide. The picture I took unfortunately is a bit dark, after you remove this you are able to get the actuator out a lot easier:
******Comparison photos********
rears:
rears:
front actuators:
front (bad photo):
******************************
******************************
Ok now all the parts are removed, now I'll explain what needs to be done to some of the parts and how to do them
******************************
The front door handles (this is only if you replaced the front door handles like I did, if you are keeping the stock ones skip this step):
In order to retain your OEM locks, or to replace the front locks you just need to remove this clip, it'll slip out, do this to the replacement part and the original key cylinder and put your other key cylinder in the new door handle:
**The rears need no modification other then switching the interior knob rod, actuator and regulator assembly is drop in***
For the front and back you will need to remove these rods and use the wagon ones. Be sure to switch these out before you put the actuators in the front. Sedans are an inch shorter and its difficult to unlock if you try to use them.
The front and rears need teh
I'll refer OG for original track and PW for the power window track:
The fronts you can see there is a difference with the longer track, i'm pointing it out in this picture:
On the OG you can pound out this dent like so (don't do this on the PW since its a little difficult to repound it back out)
Instead of pounding out the dent on the PW, there are tabs on the side of the track, just bend the lip so you can bring the roller over the ball instead (sorry no pics)
On the other end you can remove it like so:
Roller should roll out:
Switch the tracks and simply rebend the parts back to normal.
Door panels:
rears/front right, you will need to cut it about a good 2 inches I think (off the top of my head), how I did it was I would test fit the actual door handle cover and just keep cutting until I thought it was enough. Sorry no exact dimensions. There is a tab at the end of the cover that can be broken if need and it will sit in fine, I chose NOT to do that, I kept the tab, I used a dremel with a circular cut off wheel:
For the driver side, it gets a little more technical. I used the metal bracket to line everything up and I just drew it out. I would recommend going a little higher and to the left a little more (closer to the lock switch) then I did since i ran into some plastic on the rear that held the fabric down. where the screws go through you actually need to cut the plastic out. i thought the screws would go from the metal frame to door panel to switch, but it just goes metal to switch (hopefully you understand what i'm saying), this way the metal applies pressure to the surrounding area and holds the switch nice and snug. I have a decent picture on my phone but can't upload it at the moment. Here is before and after shot:
In order to run wires from the rear doors you will need to do some cutting on the rears. I looked at a sedan and figured out where the most OEM spot was to cut. I got lucky because on the opposite side was a hole waiting for me! Your welcome for this picture!
***************
Installation
***************
Reverse the order of dissassembly. Sorry no pics. Do no put on door panels or plastic, because wiring is up next!
***************
Wiring
***************
Ok now that the easy stuff is done, time to get on to this wiring. If you don't have a helms, I STRONGLY recommend it. I will try to scan some pictures for everyone since I have one. A DVOM will make life a lot easier if you go the route I did for wiring (where you use only 3 different colors of wiring black, red, yellow)
The door panel harnesses will just attach as if they were in a sedan. So go ahead and run them. DO NOT cut them otherwise you will make a big headache like I did (I was planning to go a different route but in the end decided to stick to OEM):
This are the harnesses from the outside of the door panel to the interior harness. I just cut them off as close to the interior as possibly. Now I will extend everything to reach the driver side fusebox area:
**This is how I did it so I knew what wire was what at the end, since i used only 3 different colored wires**
I cut off half of the wiring from the OEM harness/plug and attached it to the end of the yellow wire, red wire, or black wire. and then wrapped up the wiring so only the colors at both ends showed OEM coloring, no yellow or red or black would show (well black but thats for grounds)
In this picture you can see what I mean, I cut the harness in half:
In this picture you can see the yellow/red wire go to a green wire (well I guess I had used 4 colors technically :P) then back to yellow/red. The green wire was completely wrapped in electrical tape afterwards so it wouldn't cause any problems.
This is a final product, with door grommets installed at correct length (only picture i have like this of them):
The wiring should be ready to install and run through the cabin of the car to the fuse box. I had chose to run nearest the regular wiring as much as possibly rather then run it wherever I wanted. Looks better IMO:
Rear door hole that was cut:
Run on the inside of the car:
Go below this plastic piece and below the carpet to the front near the dash:
Run it below the carpet until you get near the fusebox (thats the route I took)
***
For the fronts due to space its a little more complicated:
I cut the original harness in and used it to pull my wires through to the inside of the cabin:
I tied the original wiring to the new wiring and pulled it through from the inside of the cabin, otherwise if you have a flexible/sturdy hanger you could do it that route, get creative because this is an annoying part:
********* I recommend doing the route I went because you will reuse the original wiring!!! *********
**********************************************************************************
Now just start connecting wires and you are done.
j/k
Here is where I had the wires run to (I was in the middle of connecting wires):
*There really is no specific order to go in (besides the power wires which I recommend not hooking up until you have everything else hooked up and fuses in places*
Power locks is the easiest you have white/red and yellow/red and a white/yellow. White/yellow is your 12vdc power source. White/red (lock+) and yellow/red (unlock+)are switches.
The white/red and yellow/red from the driver side door lock switch is just attached to the other 3 doors. Nothing special just connect them all together. *(the white/yellow we will come back to)
For the front right you will connect blue/black (there are 2 blu/blk coming from passenger side so make sure you have the right one),
The blue/black wire will connect with the blue/black from the driver side switch AND it will connect to the blue/black wire from the Power Window Fuse holder
The blue/green will connect to blue/green from driver side switch.
The blue/yellow will connect to the blue/yellow from driver side switch
*don't mind the yellow wire here that is for the right rear window
No pictures of the rest of the power windows but it is identical to the picture above. I will explain what goes to what.
Left (driver side) front:
White/Yellow goes from fuse holder to Driver side white/yellow switch
Left (driver side) Rear window:
Green/black goes to Grn/Blk to Grn/Blk Fuse holder
Green/yellow to Grn/Yel
Green to Green
Right (passenger) rear window:
Yellow/Black to Yel/Blk to Yel/blk fuse holder
Yellow/Green to Yel/Grn
Yellow to Yel
Now if you did as I stated life will be a lot easier for yourself:
Just connect the same color wires to the ones that were originally going to the door, remember the wires you cut and helped pull your wires through the outside to the inside of the car? Yeah those ones. All you do is match colors for the speakers, and if you have auto seatbelts you will reattach those wires:
***
Ok now you should have all necessary wires attached and you just need to run power and ground and power window relay.
I forgot to get a power window relay from the junkyard so i bypassed it for now, I can try to explain it if anybody needs help doing it (it just prevents you from being able to roll the windows down when the car is not turned on)
Hooking up the power source:
Remember that white/yellow from the power lock? Ok well technically its suppose to go to fuse 3, but I dont' have time to mess around with that right now. I would LIKE to do it in the future but I'm not a huge hurry for it. So I used a fuse holder and this is how I did it.
I attached it to the white/black wires from the fuse holder and I attached both white/black wires together. So in a sense its all 3 wires connected together (no issues so far).
This is the pic of the white/yellow wire connected:
Here is how I attached the white/black wire to the white/red power wire. Its behind the fuse box, I just split the shielding and tapped into it. *helms states white/red to white/black
For the ground wire, I just put a round fitting on and attached it to a ground (sorry no pics). Make sure the metal is bare metal and not covered in paint or you run the risk of improper ground.
Now clean up all the wires with some tape or plastic covering and tuck them away. Attach the fuse holder to the side of the fuse box:
Throw some 20a fuses in there and test them out. If everything is working perfect then you can reattach the door panels. here is what I did.
I just use some spray 3m adhesive stuff (cheap stuff works fine), fine some durable plastic and cut it out to the previous liner shape. *i covered the speaker on accident its been recut since
Throw door panels back on and enjoy.
Just some notes from my experience. cut one wire and test run it exactly how you want it to go, i had cut mine too short and ended up having to add additional wiring in (not fun in that cramped place)
Make sure all of the switches are connected when you test, I had left one unconnected and the window didn't work, but i quickly realized.
When you get to the last of the wires and you have to connect them all really take your time and make sure you are connecting the right wires, blowing fuses and troubleshooting is not fun. DVOM will help you A LOT in your automotive life purchase a decent one.
Also anything I thought was going to get wet or was a power wire I would solder and heat shrink, or any wires I thought would be moved around.
I soldered ALL wires, the interior ones I just taped up and retaped and then taped again
Will have helms pictures up soon.
Comments
I'll have a nice little write up when its complete. I've taken pictures step-by-step.
Biggest issue (besides the fun times of wiring) is the lock on the inside sit about an inch too short even when you twist them to the top. I'll compare the rods when I get a chance, hopefully its just a taller latch!
Yeah I was looking at doing the latter (what you did). I may just try to bend them to reach a little farther for now just so I can concentrate on the wiring.
I just finished wrapping the wiring, I have the rear wiring in (you have to cut it). Front wiring I'm about to pull the car in the garage and work on it for a couple of hours now.
I've tried taking step-by-step pictures as possible. Expect the write up to be posted early next week as long as all the wiring goes smooth this weekend.
Serioulsy this is a pretty big headache, but i have 8 hours at my work to do nothing
got all the hardware. just need time and some wiring diagram to do it myself.
you inspired me homes.
wagon...............................4ever...........................
i think he inspired me not to do all that work....
LOL
sommmthing
or it will look like
Fred's NoStones
'this supposed to be a car'
I have reread what you wrote a few times and am still baffled at what the hell you are referring to haha
it's Fred's Nostones
sign-stompyorfeet-beatyorchest-language
for...
if you sell to much...
you'll end up with nothing..
(aka someone wants to buy you cruise control)
Agreed! lol But very nice write-up!!
Deesracer you got all that, the whole Civic Sedan 4dr EX harness? Wondering if you got all those from an EX. As I'm currently striping out the complete power windows harness apart/away (no cutting; keep 100% OEM) from the under dashboard harness... Its pretty much a pain in the ass to separate & follow the wires along to taking the whole relay/connectors intact, but I've got it basically all out and ready to swap in my wagon.
Wondering, whomever else that attempted this mod/DIY, did you guys also grab the Control Assembly Interlock (blue box thingy) believe its called that PART# 39500-SH3-A01) under the driver seat-carpet from either EX or LX, Civic Sedan 4dr model? I BELIEVE ITS ONLY FOR AUTOMATICS BUT NO CLUE so was wondering if I should pick that up + harness to power it, which is wired along with the under dash harness.... Don't wanna leave this behind if needed with power window harness whole setup, as its not stated or mentioned... :?: